


Introduction
- Masters forge their way through a winding labyrinth in the Main Interlude version of the Tokugawa Labyrinth event!
- The event is nearly identical to the original event, with the exception of Free Quests / Challenge Quests being unavailable and no Event Currencies will drop from nodes.
- Throughout the event, Masters will collect
 Hanafuda that can be used to weaken the final boss of the event.
 - Special Event-only Master skills will replace the usual Mystic Code skills, and these new Event Master skills will gain effects and strength when making progress through the event.
- Almost all encounters during this event will have a 3-Servant party restriction, meaning one Support and two Servants can be selected for encounters. Most encounters will be a single wave (or otherwise have fewer enemies) to compensate.
- The walkthrough below takes the lowest AP path as its primary path; multiple optional paths (some of which lead to dead ends) will also be listed in the walkthrough.
- A table below summarizes the total AP cost for a first clear of the event.
| Section | Shortest Route AP | Optional Route AP | Total AP | Notes |
| F1 | 81 | 85 | 166 | Act 1-2 |
| F2 | 53 | 84 | 137 | Act 3 |
| F3 | 62 | 98 | 160 | Act 4 |
| F4 | 47 | 100 | 147 | Act 5 |
| F5 | 58 | 100 | 158 | Act 6 |
| Act 7-8 | 10 | 129 | 139 | Extra nodes open on F1~F5 |
| Act 9-End | 15 | 0 | 15 | Final Boss |
| Grand Total | 326 | 596 | 922 |
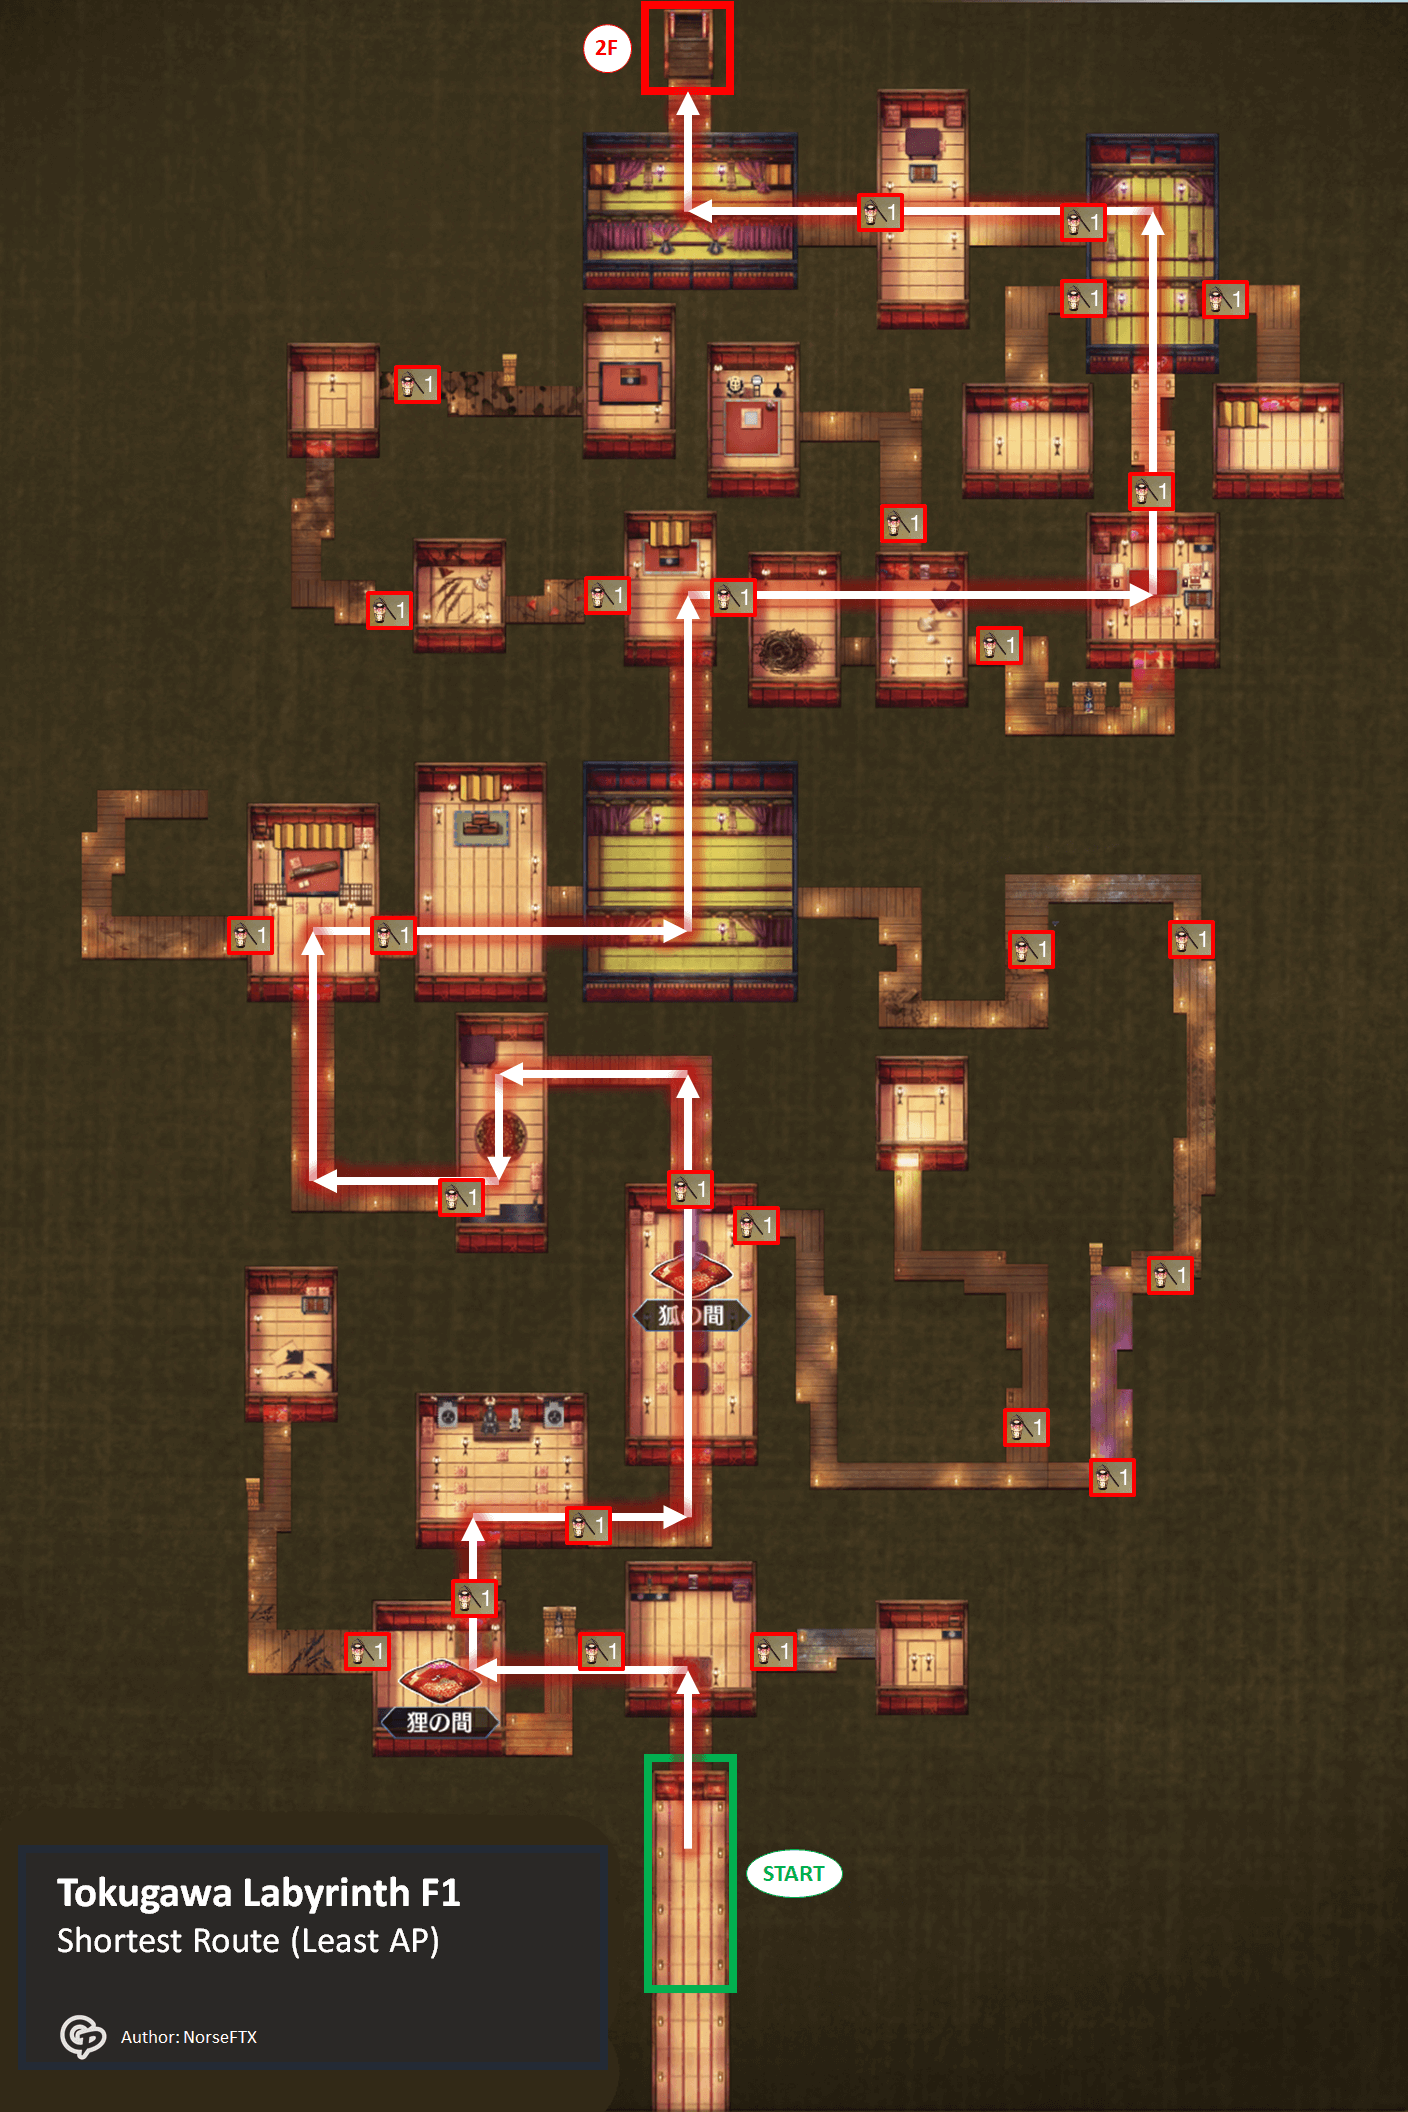
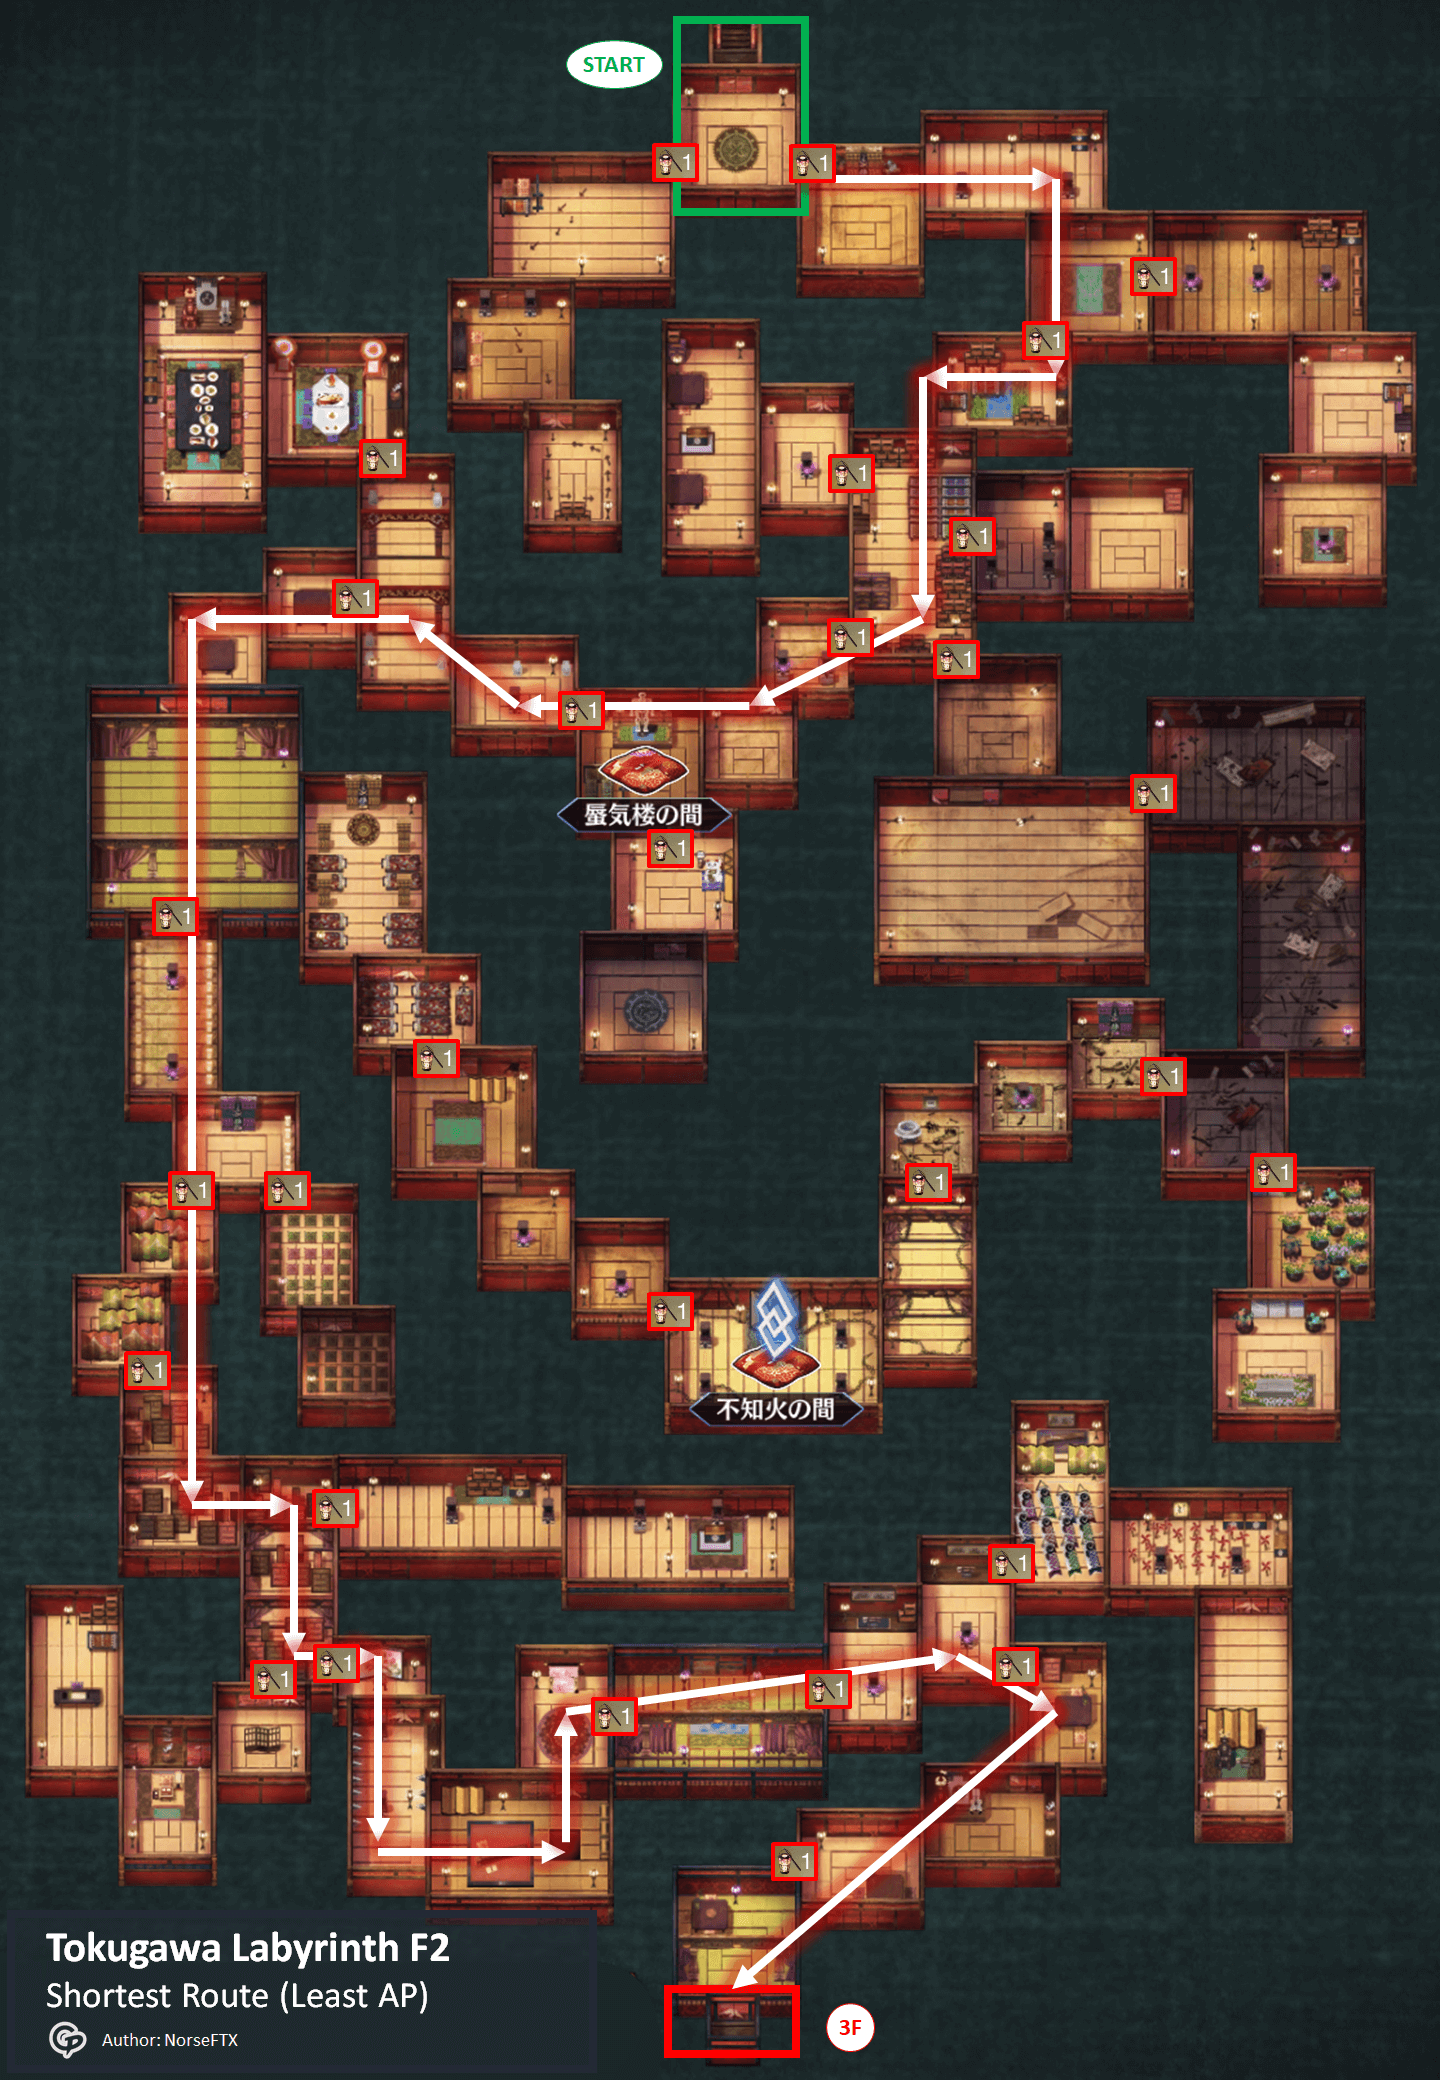
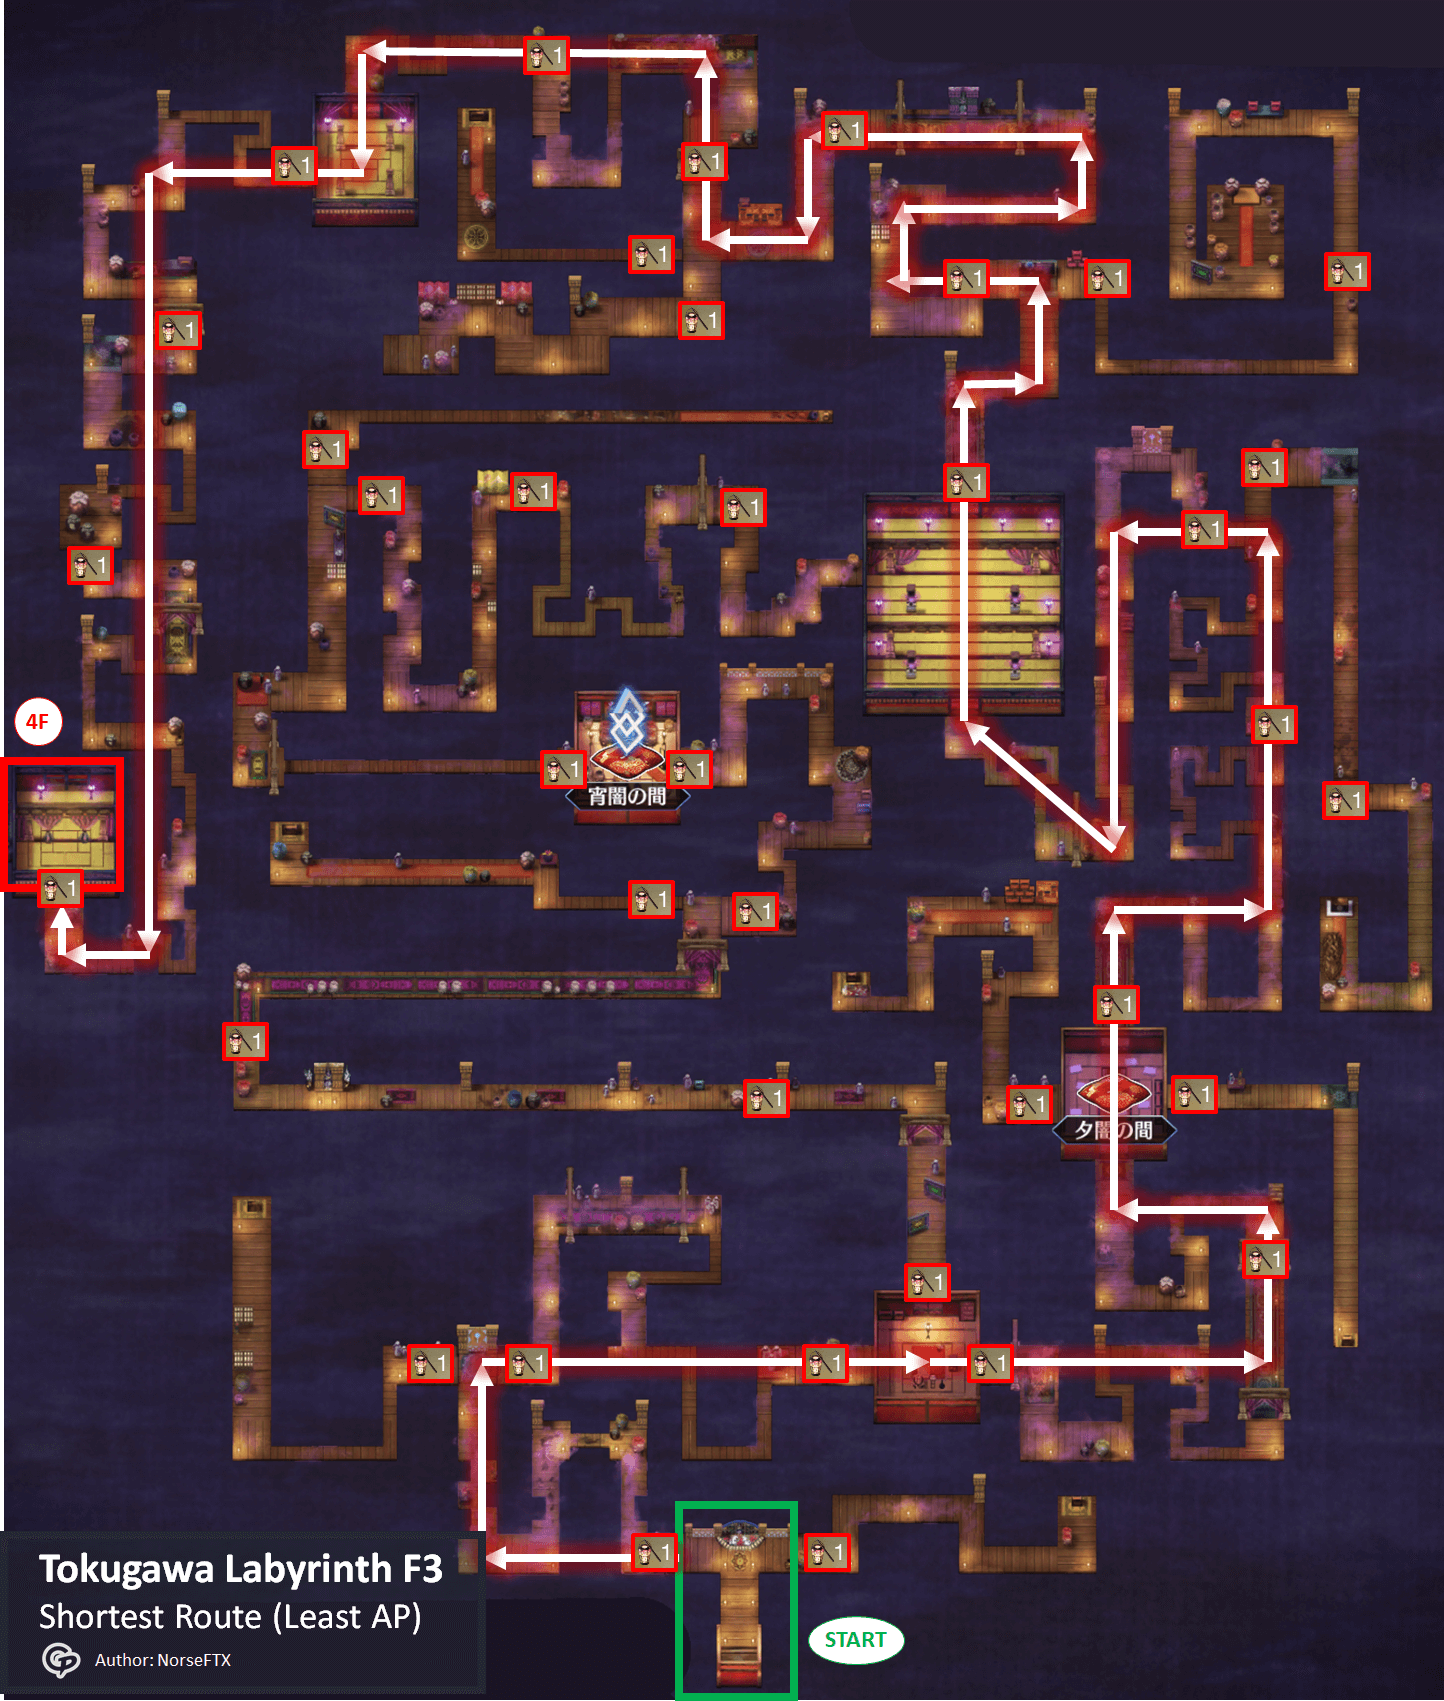
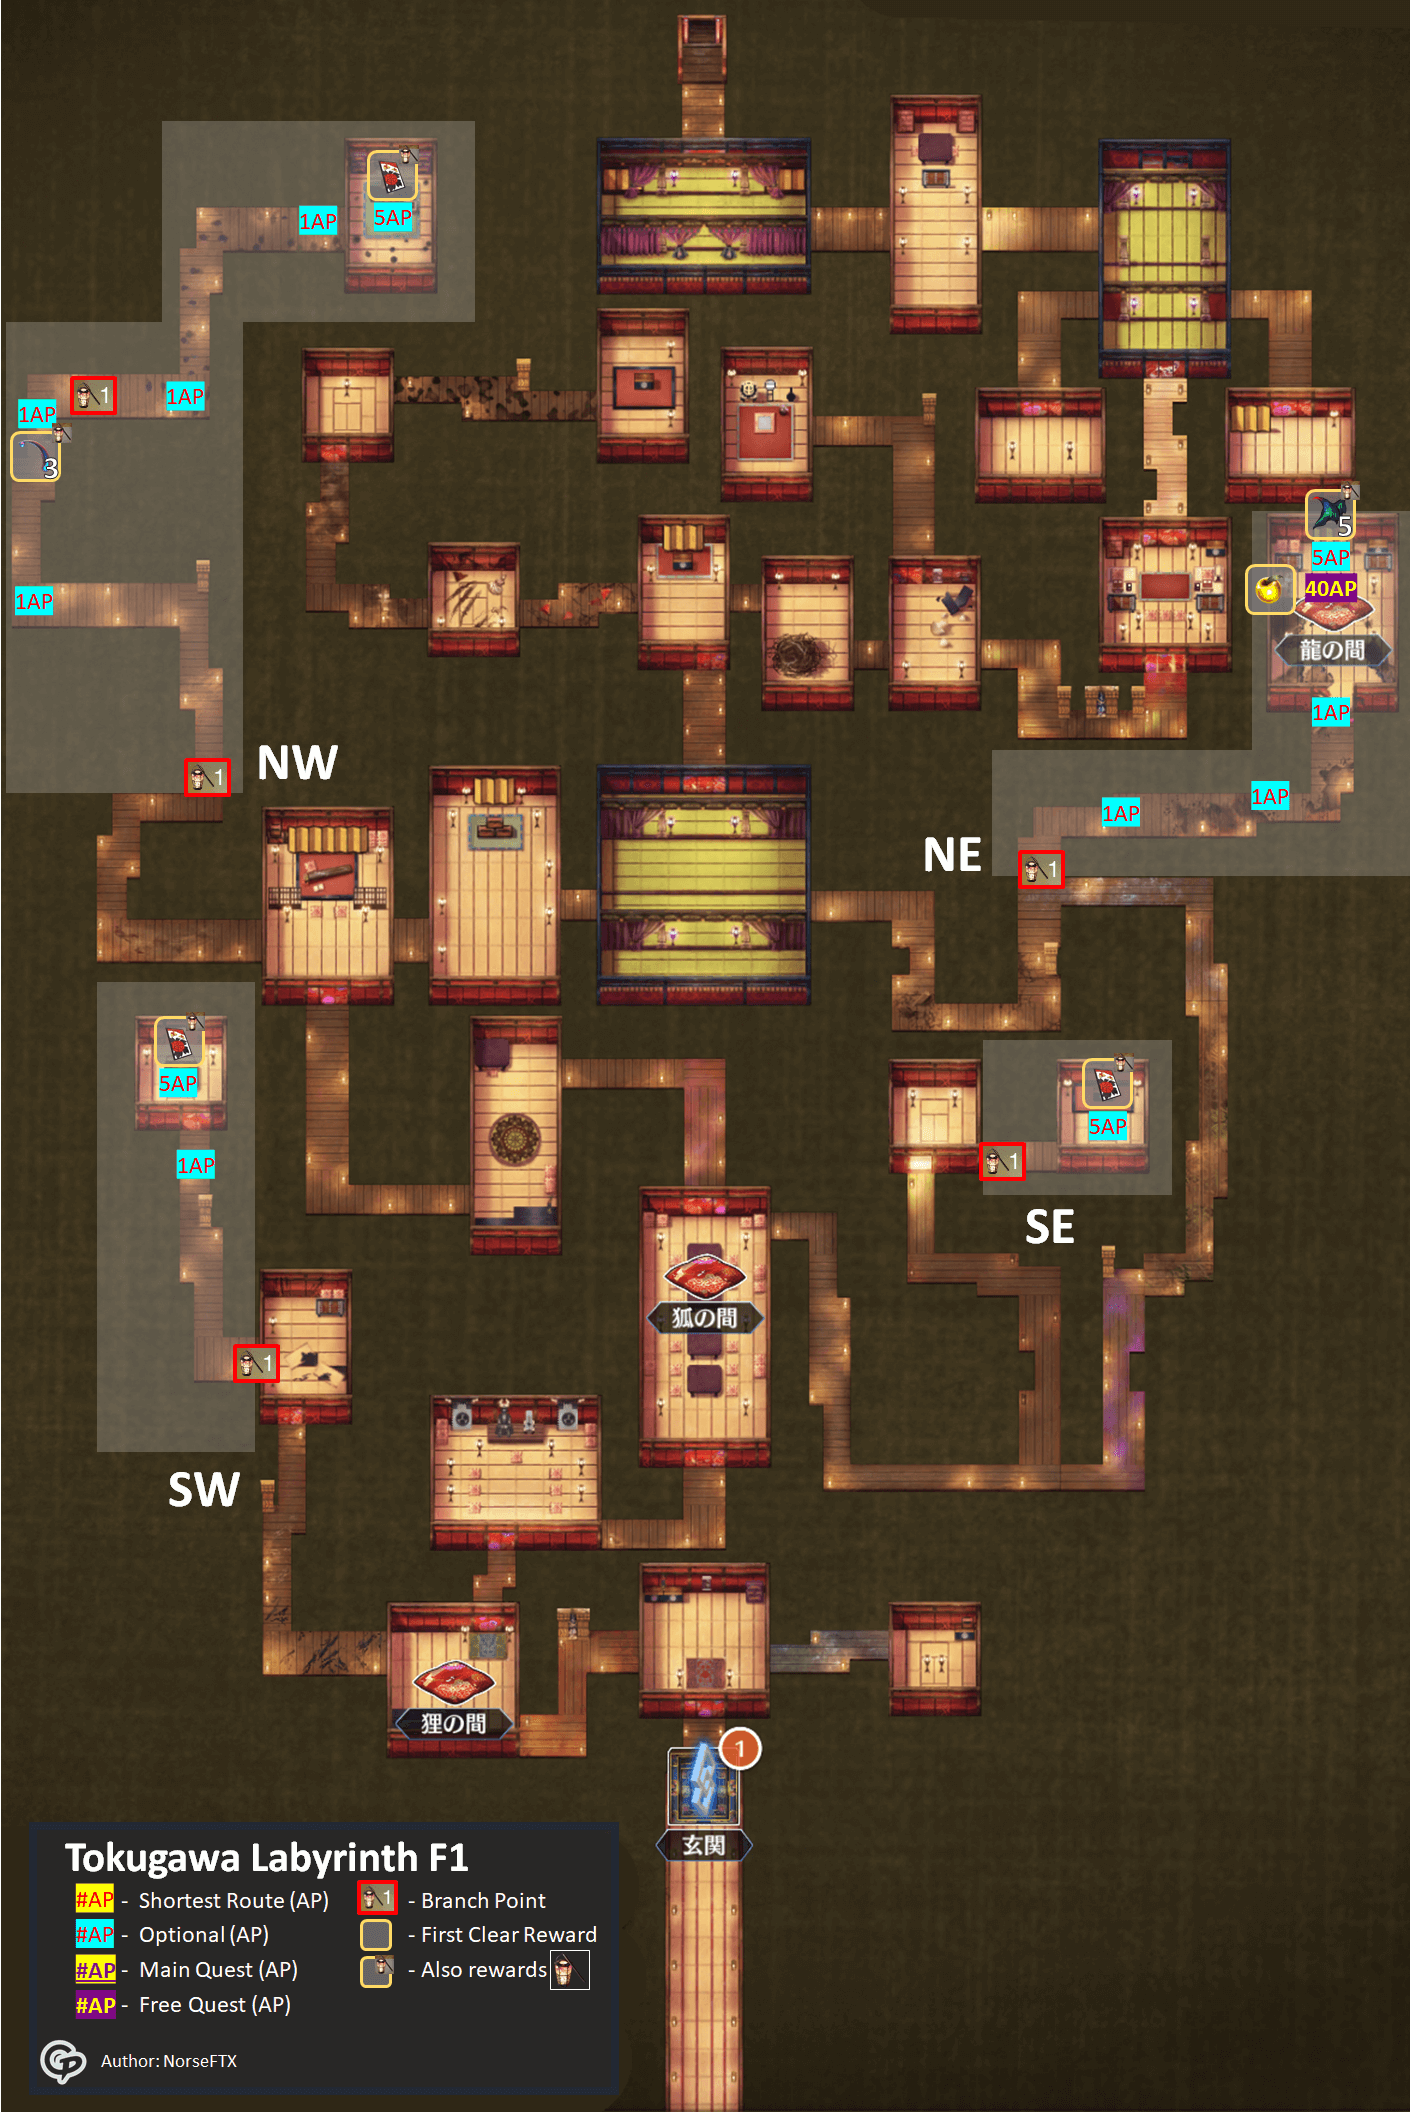
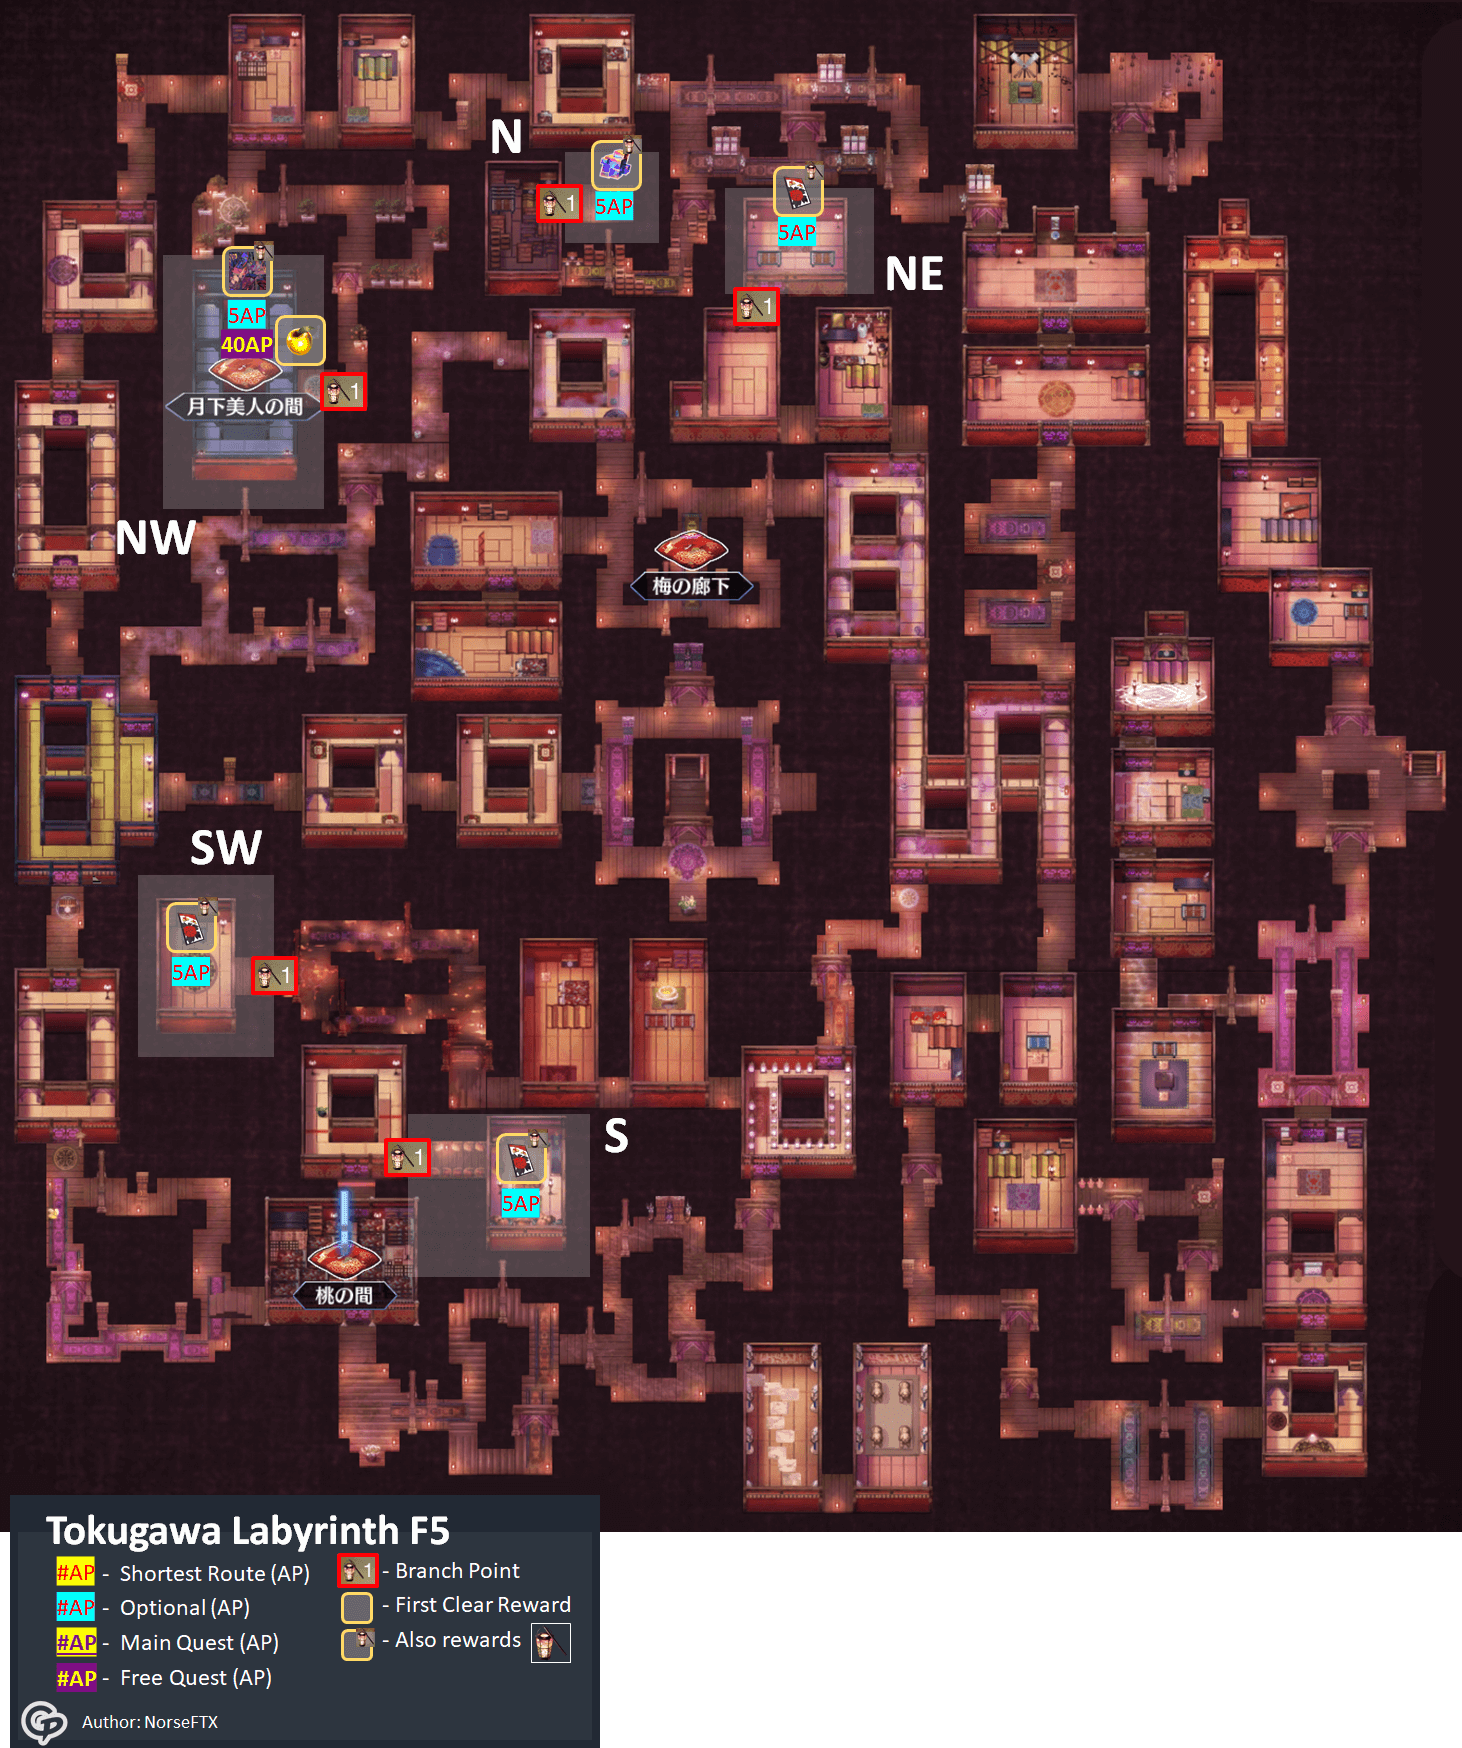
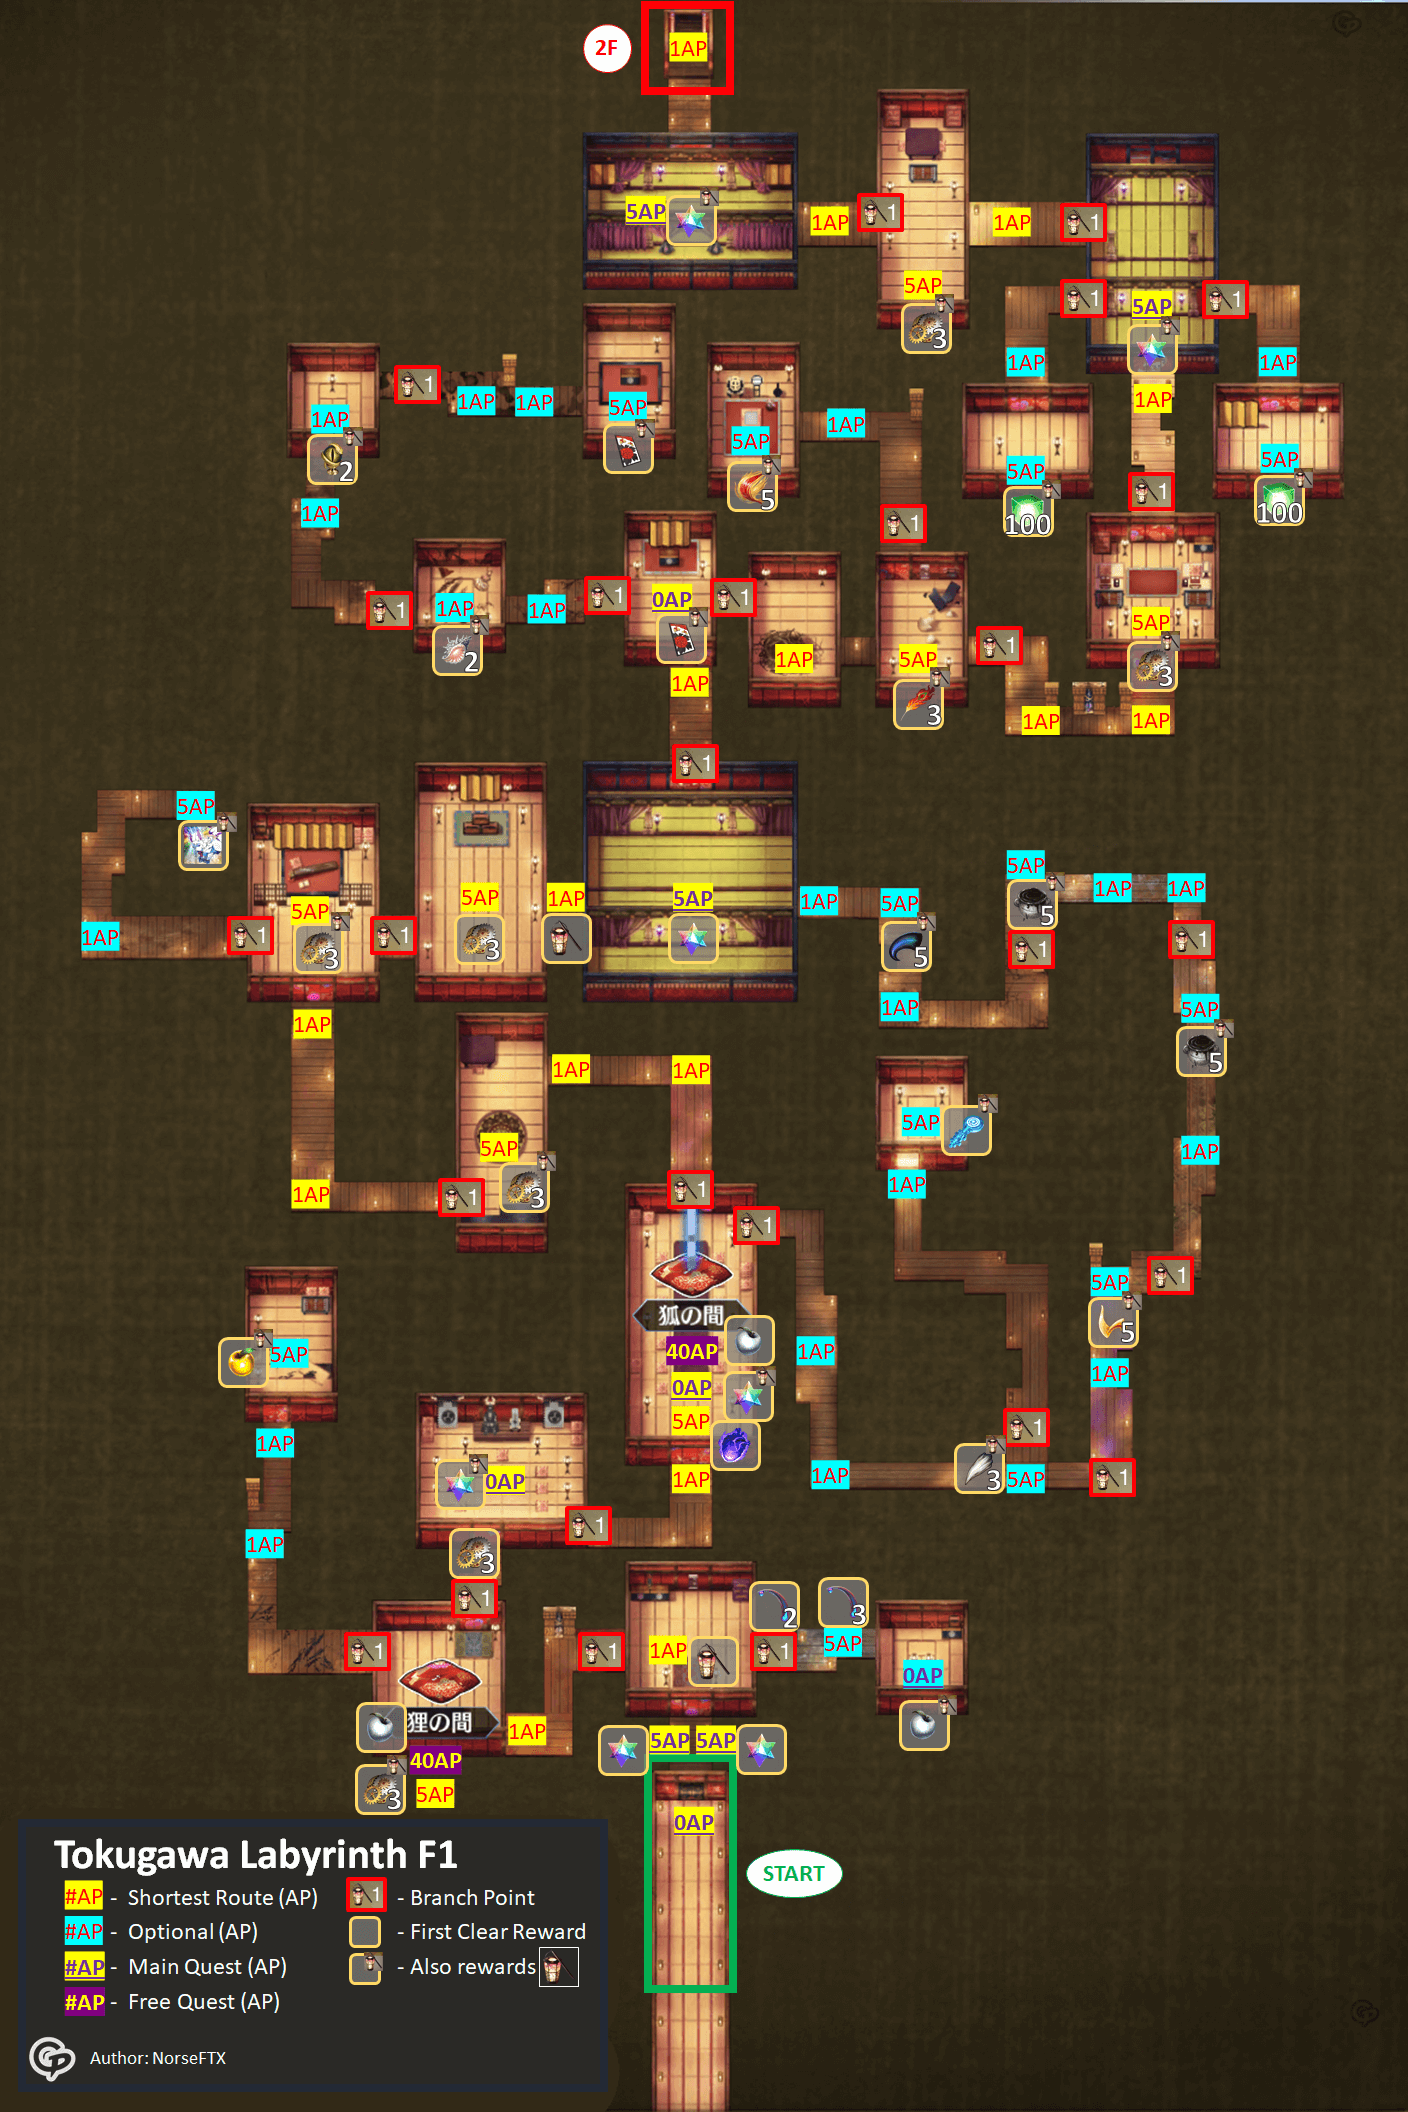
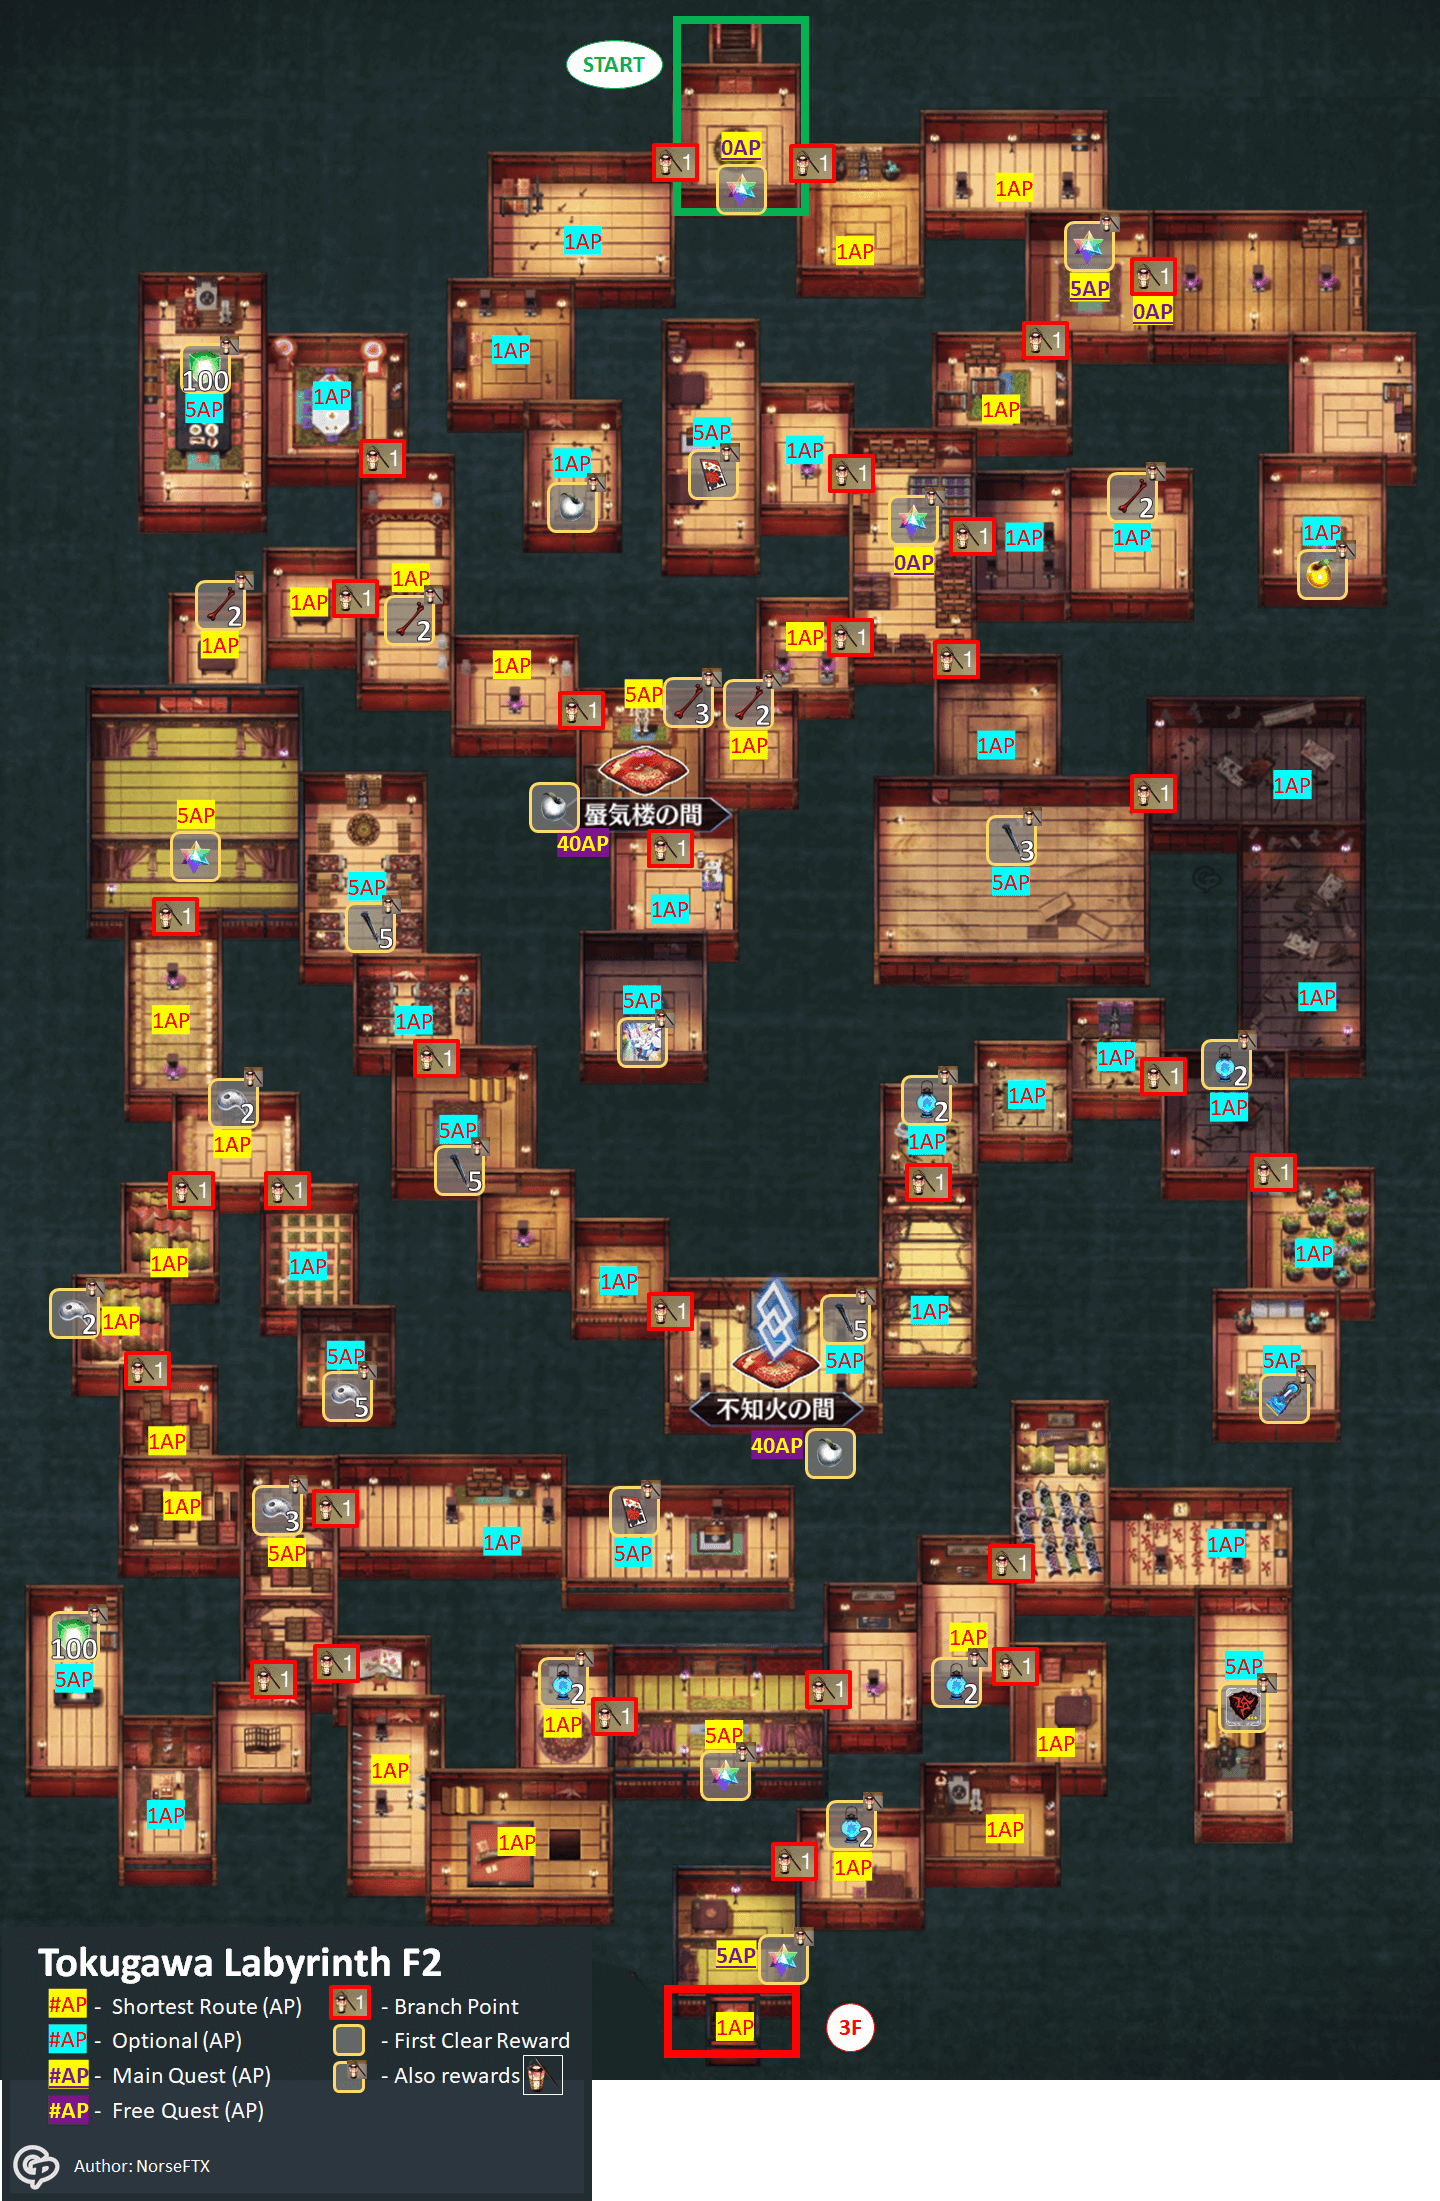
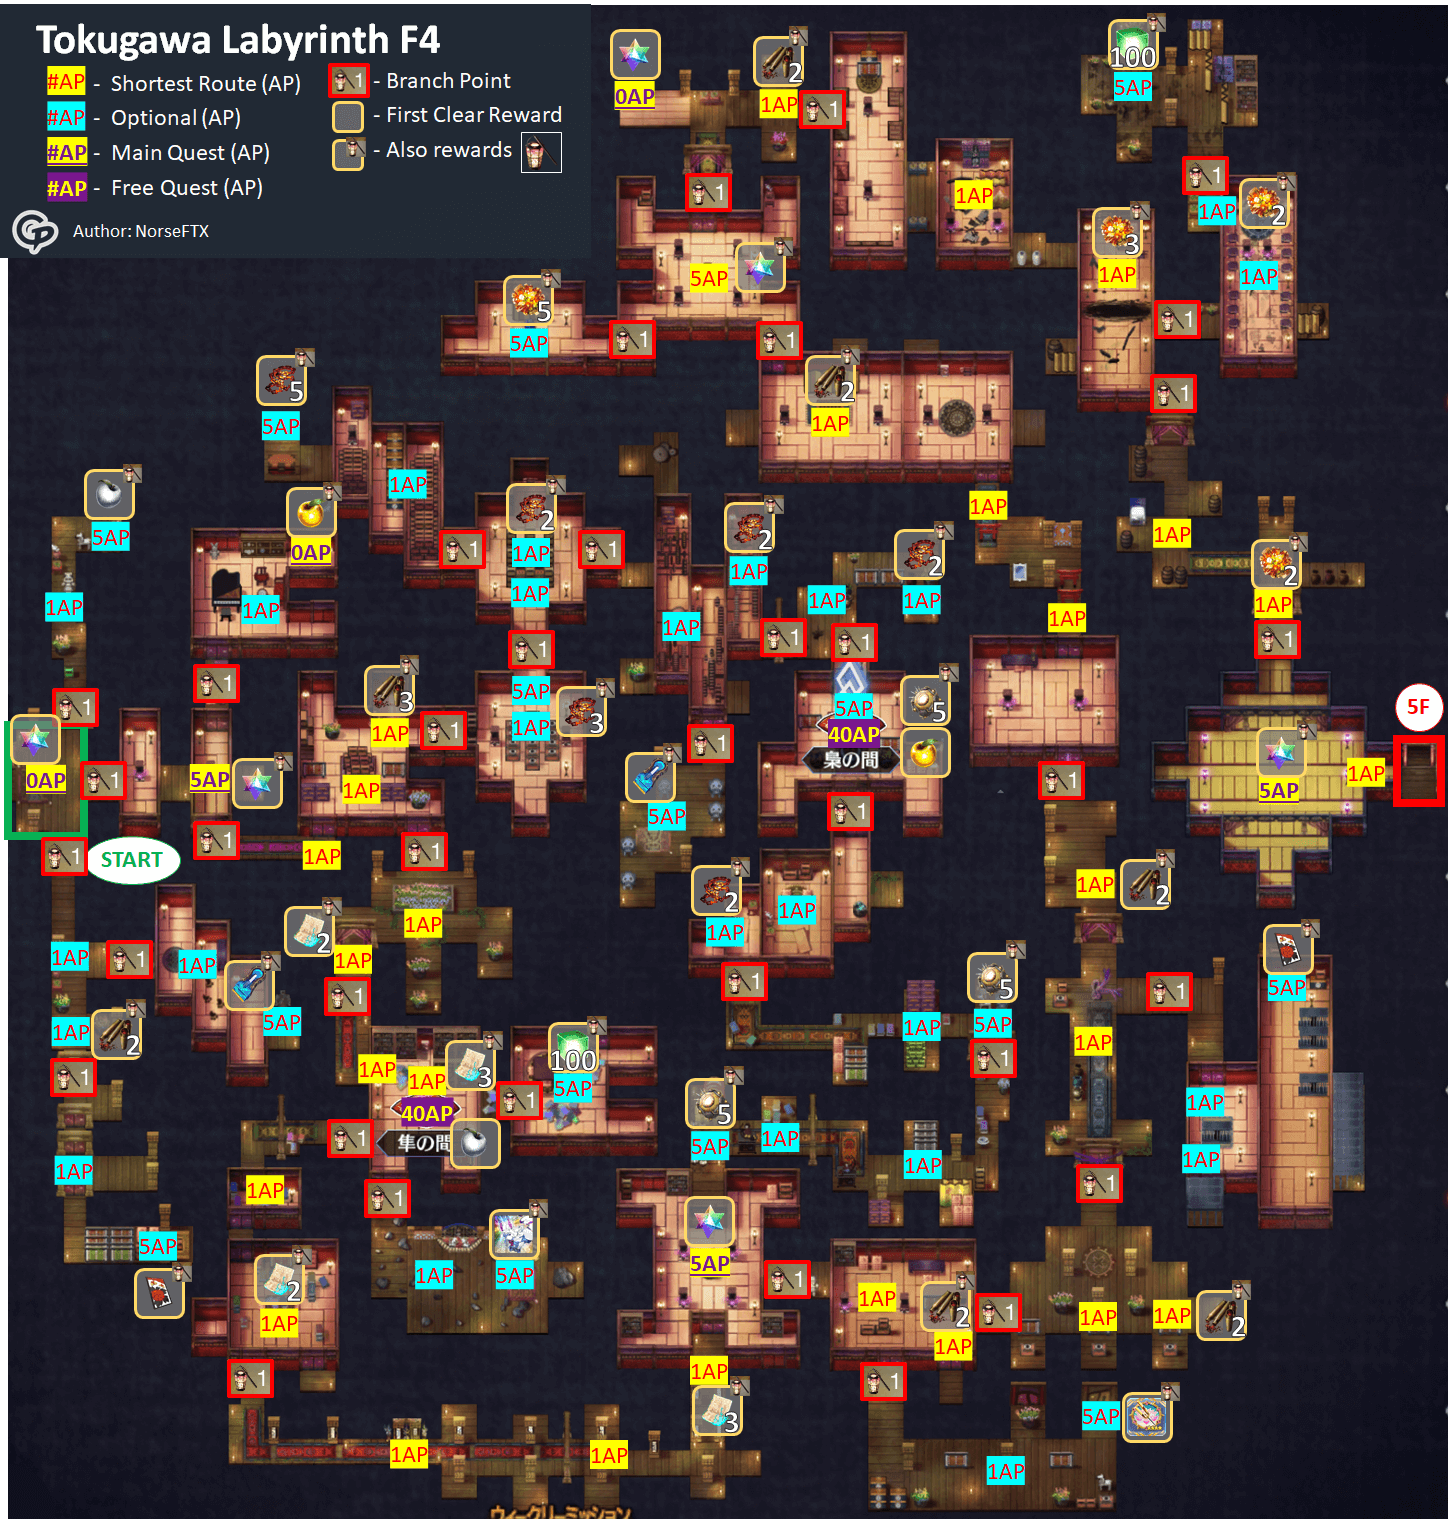
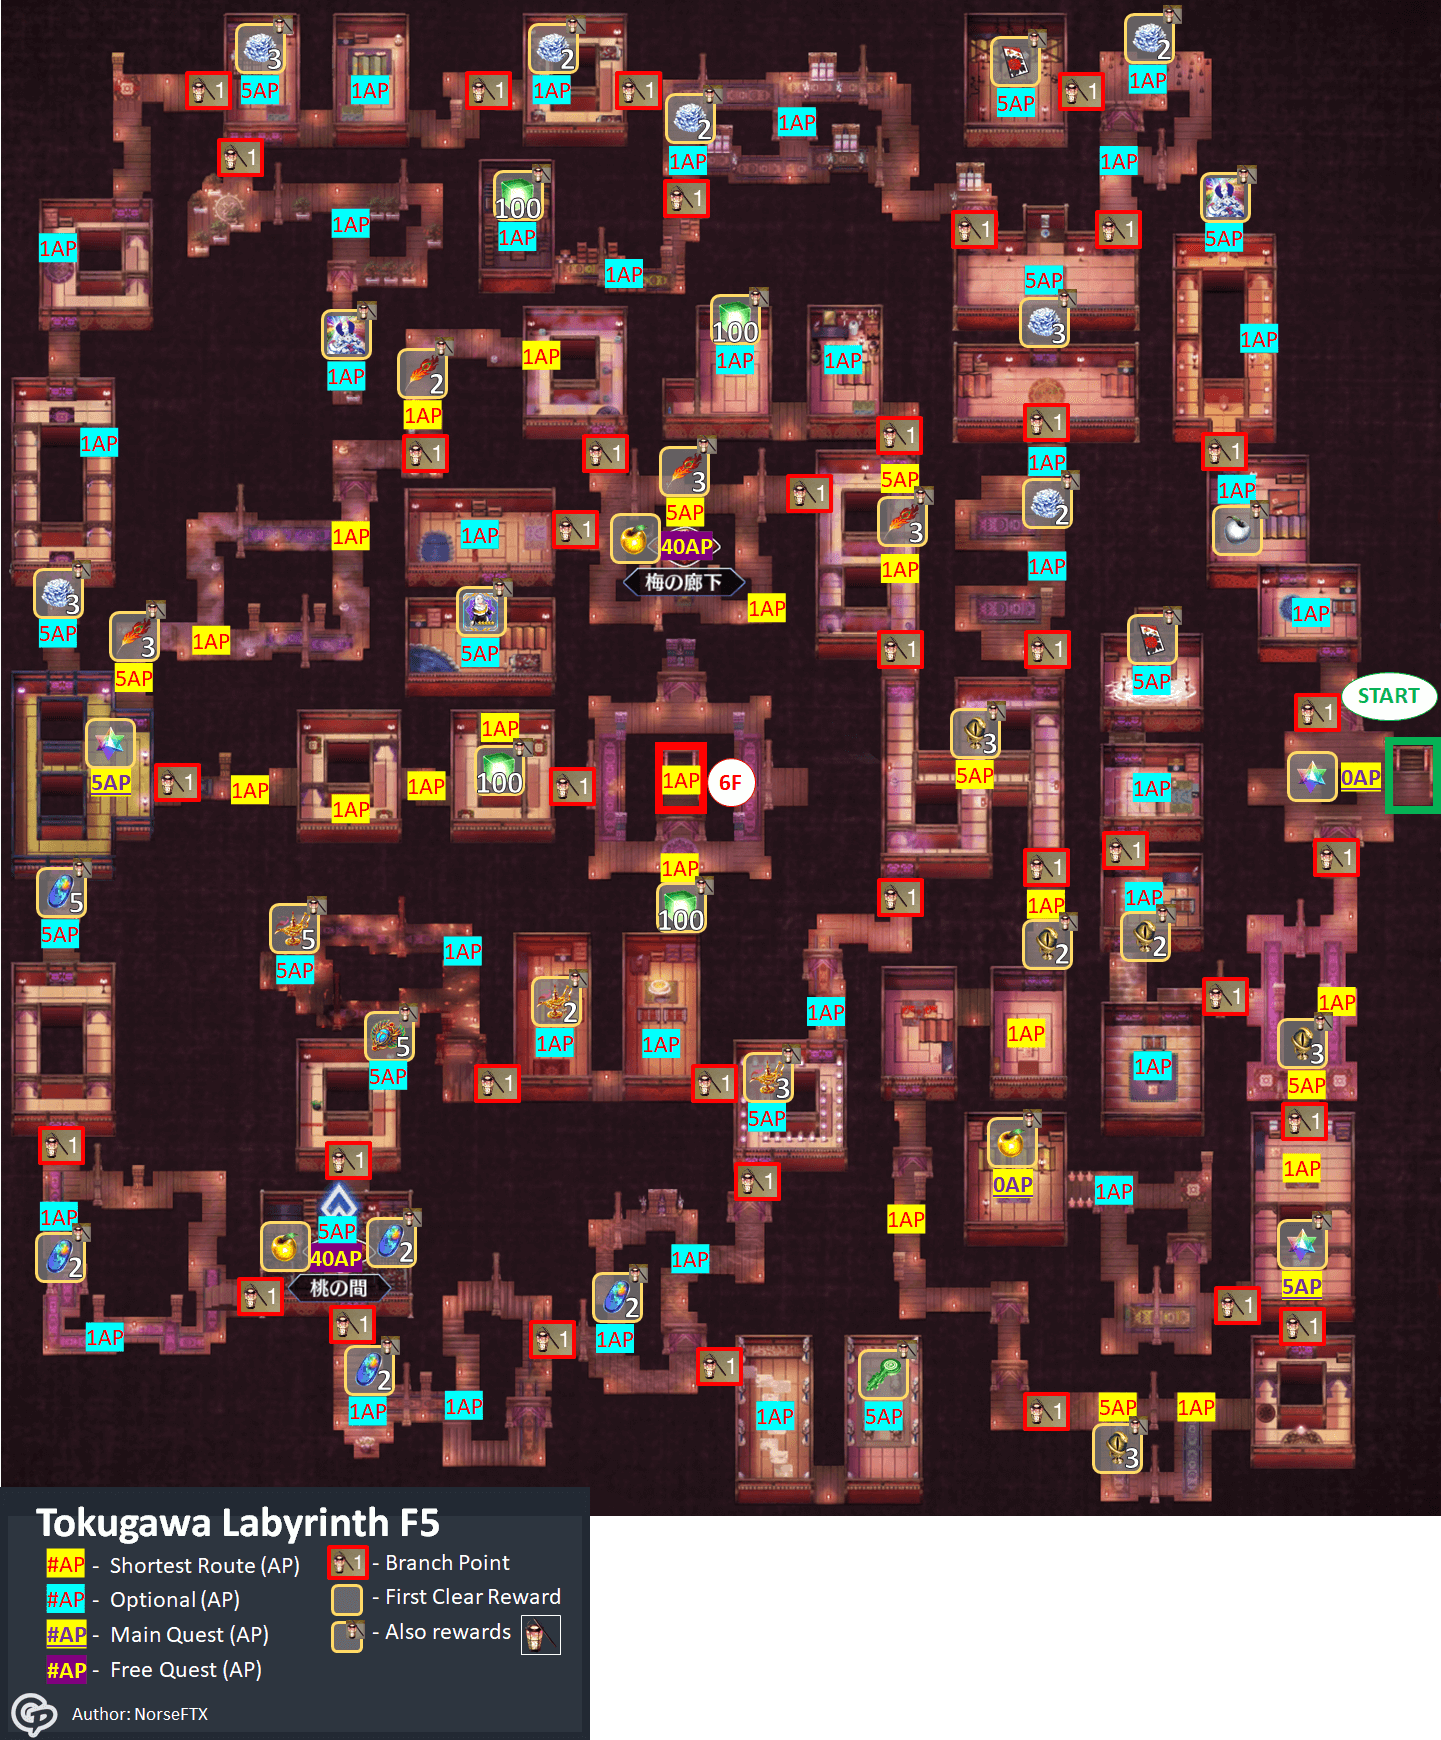
- Maps for the shortest path through each floor are also shown below.


General Tips
- The overall strategy for this event is very simple if not trying to rush through the event as quickly as possible: do every possible node available. This walkthrough is to help with knowing which bonuses to bring for which nodes, and which branches are dead ends and what bonuses they have.
- When using the walkthrough, keep a note on what step you are on so that you don't lose track of where you were! Clicking on the map in certain branch points also jump to the step at which that branch is, although only primary path branches are shown; optional branches are not shown since they are hidden in the "Optional" accordions.
- It is recommended to complete all Optional paths since the rewards are excellent for the amount of AP required, although for Masters who are late to the event and want to rush through the event as quickly as possible, Masters can judge whether they wish to enter an Optional path based on the rewards.
Changes in Main Interlude vs Original Event
- No Free Quests or farmable currencies are available.
- All enemy HP values are reduced, due to lack of Servant and Craft Essence event bonus damage for the Main Interlude.
- Challenge Quest is unavailable.
- Certain Main Quest rewards have been changed:
- Prologue: 3* Event CE -> Saint Quartz
- Night-Blooming Cereus Room: 5* Event CE -> 5,000,000 QP
Walkthrough - Floor 1 (Act 1-2)
| Quick Navigation | |||||
F1 | F2 | F3 | F4 | F5 | Act 7 |
F1 Post Act8 | F2 Post Act8 | F3 Post Act8 | F4 Post Act8 | F5 Post Act8 | Act 9 |
- White box: Area with branching path. Click to jump to corresponding walkthrough section.
| # | Quest | Notes |
| 1 | Prologue-1 (0 AP) | Story only. Story: ~5min read |
| 2 | Prologue-2 (0 AP) | Story only. Story: ~12min read |
| 3 | Prologue-3 (0 AP) | Story only. Story: ~6min read |
| 4 | Act 1-1 (0 AP) | Story only. Story: ~10min read |
| 5 | Act 1-2 (5 AP) | 3 Servant Party Restriction Single wave with two Assassins (12k, 48k HP). Story: Pre-battle ~3min read Post-battle ~1min read |
| 6 | Act 2.1 (5 AP) | 3 Servant Party Restriction Single wave with six Assassins (17-43k HP). Story: Pre-battle ~5min read Post-battle ~2min read |
| 7 | Mouse Room (1 AP) | No encounter. This quest awards the first [Osuzu Lantern], which are used to explore various branches of the labyrinth! At the end of every branch, another lantern will be awarded (even in dead ends), so it is impossible to get stuck so long as all quests in a branch are completed. Any dead ends or non-optimal routes will be indicated as 'Optional' steps in the walkthrough. Some dead ends have useful and limited time Command Codes or 4* Fous as rewards, and will be indicated; those steps can be taken if the rewards are desired, but will cost a bit more AP to traverse. These can also be left for the end, as the quests will not disappear until the end of the event. Clear Reward: |
| 7E-1 | Cold Corridor (1/2) | 3 Servant Party Restriction Single wave with three Lancers (36-49k HP). Clear Reward: | |
| 7E-2 | Cold Corridor (2/2) (5 AP) | 3 Servant Party Restriction Single wave with two Lancers (19k, 22k HP) and an Assassin (83k HP). Clear Reward: | |
| 7E-3 | Act 2.x (0 AP) | Story only. Story: ~3min read Clear Reward: | |
| End of optional branch; continue from last branch point in steps below. | |||
| 8 | Warm Corridor (1/2) | Take the W (West) path. The optional path (E = East) is in the dropdown above. No encounter. |
| 9 | Warm Corridor (2/2) (1 AP) | No encounter. |
| 10 | Tanuki Room (5 AP) | 3 Servant Party Restriction Single wave with six Assassins (9-43k HP). Clear Reward: |
| 11W-1 | Damaged Corridor (1/3) | No encounter. | |
| 11W-2 | Damaged Corridor (2/3) (1 AP) | No encounter. | |
| 11W-3 | Damaged Corridor (3/3) (1 AP) | No encounter. | |
| 11W-4 | Tiger Room (5 AP) | 3 Servant Party Restriction A lone Berserker mob (104k HP). Clear Reward: | |
| End of optional branch; continue from last branch point in steps below. | |||
| 12 | Loud Corridor | Take the N (North) path. 3 Servant Party Restriction Single wave with two Berserkers (30k,31k HP) and an Assassin (27k HP). Clear Reward: |
| 13 | Act 2.2 (0 AP) | Story only. Story: ~4min read |
| 14 | Lively Corridor(1/2) | No encounter. |
| 15 | Lively Corridor(2/2) (1 AP) | No encounter. |
| 16 | Fox Room (5 AP) | 3 Servant Party Restriction Single wave with four Assassins (13-14k HP) and one Caster (30k HP). Clear Reward: |
| 17 | Act 2.3 (0 AP) | Story only. Story: ~6min read |
| 18E-1 | Quiet Corridor (1/4) | No encounter. |
| 18E-2 | Quiet Corridor (2/4) (1 AP) | No encounter. |
| 18E-3 | Quiet Corridor (3/4) (1 AP) | No encounter. |
| 18E-4 | Quiet Corridor (4/4) (5 AP) | 3 Servant Party Restriction A single Rider mob (97k HP). Clear Reward: |
| 18E -4N -1 | Dim Corridor (1/2) | No encounter. | |
| 18E -4N -2 | Dim Corridor (2/2) (1 AP) | No encounter. | |
| 18E -4N -3 | Wolf Room (5 AP) | 3 Servant Party Restriction A single Rider mob (189k HP). Clear Reward: | |
| End of optional branch; continue from last branch point in steps below. | |||
| 18E-5 | Stagnant Corridor (1/3) | This is the E (East) path. No encounter. | |
| 18E-6 | Stagnant Corridor (2/3) (1 AP) | No encounter. | |
| 18E-7 | Stagnant Corridor (3/3) (5 AP) | 3 Servant Party Restriction A lone Lancer mob (97k HP). Clear Reward: | |
| 18E-8 | Eerie Corridor (1/3) | No encounter. | |
| 18E-9 | Eerie Corridor (2/3) (1 AP) | No encounter. | |
| 18E-10 | Eerie Corridor (3/3) (5 AP) | 3 Servant Party Restriction A single Assassin mob (98k HP). Clear Reward: | |
| 18E-11 | Chilling Corridor (1/4) | No encounter. | |
| 18E-12 | Chilling Corridor (2/4) (1 AP) | No encounter. | |
| 18E-13 | Chilling Corridor (3/4) (1 AP) | No encounter. | |
| 18E-14 | Chilling Corridor (4/4) (5 AP) | 3 Servant Party Restriction A single Assassin mob (98k HP). Clear Reward: | |
| 18E-15 | Terrifying Corridor (1/3) | No encounter. | |
| 18E-16 | Terrifying Corridor (2/3) (1 AP) | No encounter. | |
| 18E-17 | Terrifying Corridor (3/3) (5 AP) | 3 Servant Party Restriction A single Berserker mob (104k HP). Clear Reward: | |
| 18E-18 | Front of the Big Room (Alternate) (1 AP) | No encounter. | |
| End of alternate route; if this route is taken, can skip to Step 30 (or can continue below starting from the original branching point; steps 19-29 lead up to the same room). | |||
| 19 | Aromatic Corridor (1/3) | Take the N (North) path. Note the alternative route (in the drop down above) will end up in the same room as this route, although the alt route is slower AP-wise. No encounter. |
| 20 | Aromatic Corridor (2/3) (1 AP) | No encounter. |
| 21 | Aromatic Corridor (3/3) (1 AP) | No encounter. |
| 22 | Deer Room (5 AP) | 3 Servant Party Restriction Single wave of five Assassins (12-23k HP). Clear Reward: |
| 23 | Beautiful Corridor (1/3) | No encounter. |
| 24 | Beautiful Corridor (2/3) (1 AP) | No encounter. |
| 25 | Beautiful Corridor (3/3) (1 AP) | No encounter. |
| 26 | Sheep Room (5 AP) | 3 Servant Party Restriction Single wave of five Assassins (12-24k HP). Clear Reward: |
| 26W-1 | Beat-Up Corridor (1/3) | No encounter. | |
| 26W-2 | Beat-Up Corridor (2/3) (1 AP) | No encounter. | |
| 26W-3 | Beat-Up Corridor (3/3) (5 AP) | 3 Servant Party Restriction A large Assassin mob (188k HP). Clear Reward: | |
| End of optional branch; continue from last branch point in steps below. | |||
| 27 | Luxurious Corridor | This is the E (East) path. No encounter. |
| 28 | Cow Room (5 AP) | 3 Servant Party Restriction Single wave of five Assassins (12-23k HP). Clear Reward: |
| 29 | Front of the Big Room (1 AP) | No encounter. Clear Reward: |
| 30 | Act 2.4 (5 AP) | 3 Servant Party Restriction This encounter has a single wave with a large Assassin (101k HP) and six smaller Assassins (14-15k HP). The large Assassin starts with six DEF buff stacks, and defeating the smaller Assassins (who have an ATK buff) will remove one DEF buff stack each. AoE damage dealers are a great choice for this encounter to quickly eliminate the smaller Assassins. Gain access to Event Master Skills after this quest! Story: Pre-battle ~7min read Post-battle ~5min read |
| 31 | Elegant Corridor (1/2) | No encounter. |
| 32 | Elegant Corridor (2/2) (1 AP) | No encounter. |
| 33 | Int 1 (0 AP) | Story only. Story: ~2min read |
| 33W-1 | Shredded Corridor (1/2) | No encounter. | |
| 33W-2 | Shredded Corridor (2/2) (1 AP) | No encounter. | |
| 33W-3 | Spider Room (1 AP) | No encounter. Clear Reward: | |
| 33W-4 | Slimy Corridor (1/2) | No encounter. | |
| 33W-5 | Slimy Corridor (2/2) (1 AP) | No encounter. | |
| 33W-6 | Octopus Room (1 AP) | No encounter. Clear Reward: | |
| 33W-7 | Decayed Corridor (1/3) | No encounter. | |
| 33W-8 | Decayed Corridor (2/3) (1 AP) | No encounter. | |
| 33W-9 | Decayed Corridor (3/3) (1 AP) | No encounter. | |
| 33W-10 | Snake Room (5 AP) | 3 Servant Party Restriction A single Archer mob (98k HP). Clear Reward: | |
| End of optional branch; continue from last branch point in steps below. | |||
| 34 | Fluffy Corridor | Take the E (East) path. No encounter. |
| 35 | Egg Room (1 AP) | No encounter. |
| 36 | Chicken Room (5 AP) | 3 Servant Party Restriction Single wave with three Berserker enemies (27-36k HP). Clear Reward: |
| 36N-1 | Smelly Corridor (1/2) | No encounter. | |
| 36N-2 | Smelly Corridor (2/2) (1 AP) | No encounter. | |
| 36N-3 | Weasel Room (5 AP) | 3 Servant Party Restriction A single Rider mob (97k HP). Clear Reward: | |
| End of optional branch; continue from last branch point in steps below. | |||
| 37 | Dazzling Corridor (1/3) | Take the E (East) path. No encounter. |
| 38 | Dazzling Corridor (2/3) (1 AP) | No encounter. |
| 39 | Dazzling Corridor (3/3) (1 AP) | No encounter. |
| 40 | Goldfish Room (5 AP) | 3 Servant Party Restriction Single wave of five Assassin enemies (12-24k HP). Clear Reward: |
| 41 | Spick-and-Span Corridor (1/2) | No encounter. |
| 42 | Spick-and-Span Corridor (2/2) (1 AP) | No encounter. |
| 43 | Int 2 (5 AP) | 3 Servant Party Restriction A large Rider mob (198k HP). It starts by buffing both itself and the frontline party with ATK up. Story (Post-battle): ~2min read |
| 43SW-1 | Brisk Walking Corridor (1/2) | No encounter. | |
| 43SW-2 | Brisk Walking Corridor (2/2) (1 AP) | No encounter. | |
| 43SW-3 | Boar Room (5 AP) | 3 Servant Party Restriction A large Berserker mob (106k HP). Clear Reward: | |
| End of optional branch; continue from last branch point in steps below. | |||
| 43SE-1 | Restless Corridor (1/2) | No encounter. | |
| 43SE-2 | Restless Corridor (2/2) (1 AP) | No encounter. | |
| 43SE-3 | Monkey Room (5 AP) | 3 Servant Party Restriction A lone Berserker mob (104k HP). Clear Reward: | |
| End of optional branch; continue from last branch point in steps below. | |||
| 44 | Exhilarating Corridor (1/2) | Take the NW (Northwest) path. No encounter. | |
| 45 | Exhilarating Corridor (2/2) (1 AP) | No encounter. | |
| 46 | Rabbit Room (5 AP) | 3 Servant Party Restriction Single wave of five Assassin enemies (12-24k HP). Clear Reward: | |
| 47 | Sleepy Corridor (1/2) | No encounter. | |
| 48 | Sleepy Corridor (2/2) (1 AP) | No encounter. | |
| 49 | Int 3 (5 AP) | 3 Servant Party Restriction A large Caster mob (202k HP). Similarly to the prior encounter, it starts by buffing both itself and the frontline party with ATK up. Story: Pre-battle ~7min read Post-battle ~7min read | |
| 50 | To 2nd Floor (1 AP) | No encounter. | |
| First Floor (part 1) is complete! The first floor and any free quests / remaining exploration quests can be revisited any time throughout the duration of the event. Floor 2 continues below. | |||
Walkthrough - Floor 2 (Act 3) - 8/2/2022 21:00 PDT
| Quick Navigation | |||||
F1 | F2 | F3 | F4 | F5 | Act 7 |
F1 Post Act8 | F2 Post Act8 | F3 Post Act8 | F4 Post Act8 | F5 Post Act8 | Act 9 |
| # | Quest | Notes |
| 51 | Act 3.1 (0 AP) | Story only. Story: ~3min read |
| 51W -1 | Sitting Room with an Arrow (1/4) | No encounter. | |
| 51W -2 | Sitting Room with an Arrow (2/4) (1 AP) | No encounter. | |
| 51W -3 | Sitting Room with an Arrow (3/4) (1 AP) | No encounter. | |
| 51W -4 | Sitting Room with an Arrow (4/4) (1 AP) | No encounter. Clear Reward: | |
| End of optional branch; continue from last branch point in steps below. | |||
| 52 | Sitting Room with a Stiff Door (1/3) | Take the E (East) path. No encounter. |
| 53 | Sitting Room with a Stiff Door (2/3) (1 AP) | No encounter. |
| 54 | Sitting Room with a Stiff Door (3/3) (1 AP) | No encounter. |
| 55 | Act 3.2 (5 AP) | 3 Servant Party Restriction Single wave with four Assassins (19-23k HP). Story: Pre-battle ~5min read Post-battle ~4min read |
| 55E -1 | Act 3.x | Story only. Story: ~5min read | |
| 55E -2 | Impasse Sitting Room (1 AP) | No encounter. Clear Reward: | |
| End of optional branch; continue from last branch point in steps below. | |||
| 56 | Cramped-Looking Sitting Room (1/2) | Take the S (South) path. No encounter. |
| 57 | Cramped-Looking Sitting Room (2/2) (1 AP) | No encounter. |
| 58 | Act 3.3 (0 AP) | Story only. Story: ~8min read |
| 58NW -1 | Sitting Room with Treasure (1/3) | This branch is for obtaining No encounter. | |
| 58NW -2 | Sitting Room with Treasure (2/3) (1 AP) | No encounter. | |
| 58NW -3 | Sitting Room with Treasure (3/3) (5 AP) | 3 Servant Party Restriction Single wave of six Assassins (21-26k HP). Clear Reward: | |
| End of optional branch; continue from last branch point in steps below. | |||
| 58E -1 | Dead-End Sitting Room (1/3) | No encounter. | |
| 58E -2 | Dead-End Sitting Room (2/3) (1 AP) | No encounter. | |
| 58E -3 | Dead-End Sitting Room (3/3) (1 AP) | No encounter. Clear Reward: | |
| End of optional branch; continue from last branch point in steps below. | |||
| 58SE -1 | Open Sitting Room (1/3) | No encounter. |
| 58SE -2 | Open Sitting Room (2/3) (1 AP) | No encounter. |
| 58SE -3 | Open Sitting Room (3/3) (5 AP) | 3 Servant Party Restriction Single wave with six Berserkers (20-27k HP). Clear Reward: |
| 58SE -4 | Probably Haunted Sitting Room (1/4) | No encounter. |
| 58SE -5 | Probably Haunted Sitting Room (2/4) (1 AP) | No encounter. |
| 58SE -6 | Probably Haunted Sitting Room (3/4) (1 AP) | No encounter. |
| 58SE -7 | Probably Haunted Sitting Room (4/4) (1 AP) | No encounter. Clear Reward: |
| 58SE -7S -1 | Paradise Sitting Room (1/3) | No encounter. | |
| 58SE -7S -2 | Paradise Sitting Room (2/3) (1 AP) | No encounter. | |
| 58SE -7S -3 | Paradise Sitting Room (3/3) (5 AP) | 3 Servant Party Restriction A single Lancer mob (189k HP). Clear Reward: | |
| End of optional branch; continue from last branch point in steps below. | |||
| 58SE -8 | Hellish Sitting Room (1/4) | No encounter. | |
| 58SE -9 | Hellish Sitting Room (2/4) (1 AP) | No encounter. | |
| 58SE -10 | Hellish Sitting Room (3/4) (1 AP) | No encounter. | |
| 58SE -11 | Hellish Sitting Room (4/4) (1 AP) | No encounter. Clear Reward: | |
| 58SE -12 | Chained-Up Sitting Room (1/3) | No encounter. | |
| 58SE -13 | Chained-Up Sitting Room (2/3) (1 AP) | No encounter. | |
| 58SE -14 | Chained-Up Sitting Room (3/3) (5 AP) | 3 Servant Party Restriction Single wave with three Berserkers (29-36k HP). Clear Reward: | |
| 58SE -16 | Headwind Sitting Room (1/3) | No encounter. | |
| 58SE -17 | Headwind Sitting Room (2/3) (1 AP) | No encounter. | |
| 58SE -18 | Headwind Sitting Room (3/3) (5 AP) | 3 Servant Party Restriction Single wave with three Berserkers (29-37k HP). Clear Reward: | |
| 58SE -19 | Laid-Out Futon Sitting Room (1/3) | No encounter. | |
| 58SE -20 | Laid-Out Futon Sitting Room (2/3) (1 AP) | No encounter. | |
| 58SE -21 | Laid-Out Futon Sitting Room (3/3) (5 AP) | 3 Servant Party Restriction Single wave with three Berserkers (29-36k HP). Clear Reward: | |
| End of alternate route; if this route is taken, can skip to Step 71 (or can continue below starting from the original branching point; steps 59-70 lead up to the same room). | |||
| 59 | Walls-Only Sitting Room (1/3) | Take the SW (Southwest) path. No encounter. |
| 60 | Walls-Only Sitting Room (2/3) (1 AP) | No encounter. |
| 61 | Walls-Only Sitting Room (3/3) (1 AP) | No encounter. Clear Reward: |
| 62 | Road Block Sitting Room (1/2) | No encounter. |
| 63 | Road Block Sitting Room (2/2) (5 AP) | 3 Servant Party Restriction Single wave with two each of Saber, Lancer, and Archer mobs (18-23k HP). Clear Reward: |
| 64S -1 | Maneki Neko Sitting Room (1/3) | No encounter. | |
| 64S -2 | Maneki Neko Sitting Room (2/3) (1 AP) | No encounter. | |
| 64S -3 | Maneki Neko Sitting Room (3/3) (5 AP) | 3 Servant Party Restriction A single Saber mob (189k HP). Clear Reward: | |
| End of optional branch; continue from last branch point in steps below. | |||
| 65 | Cat Repellent Sitting Room (1/3) | Take the W (West) path. No encounter. |
| 66 | Cat Repellent Sitting Room (2/3) (1 AP) | No encounter. |
| 67 | Cat Repellent Sitting Room (3/3) (1 AP) | No encounter. Clear Reward: |
| 67N -1 | Booming Business Sitting Room (1/3) | No encounter. | |
| 67N -2 | Booming Business Sitting Room (2/3) (1 AP) | No encounter. | |
| 67N -3 | Booming Business Sitting Room (3/3) (5 AP) | 3 Servant Party Restriction Single wave with two each of Saber, Archer, and Assassin mobs (20-27k HP). Clear Reward: | |
| End of optional branch; continue from last branch point in steps below. | |||
| 68 | No First-Timers Sitting Room (1/3) | Take the W (West) path. No encounter. |
| 69 | No First-Timers Sitting Room (2/3) (1 AP) | No encounter. |
| 70 | No First-Timers Sitting Room (3/3) (1 AP) | No encounter. Clear Reward: |
| 71 | Deceptive Room (5 AP) | 3 Servant Party Restriction A large Rider mob (191k HP). Clear Reward: |
| 72 | Humid Sitting Room (1/3) | No encounter. |
| 73 | Humid Sitting Room (2/3) (1 AP) | No encounter. |
| 74 | Humid Sitting Room (3/3) (1 AP) | No encounter. Clear Reward: |
| 74SE -1 | Sitting Room Full of Floor Cushions (1/3) | No encounter. | |
| 74SE -2 | Sitting Room Full of Floor Cushions (2/3) (1 AP) | No encounter. | |
| 74SE -3 | Sitting Room Full of Floor Cushions (3/3) (5 AP) | 3 Servant Party Restriction Single wave with two Saber (28-29k HP) and one Assassin (38k HP). Clear Reward: | |
| End of optional branch; continue from last branch point in steps below. | |||
| 75 | Sitting Room Full of Folding Screens (1/3) | Take the SW (Southwest) path. No encounter. |
| 76 | Sitting Room Full of Folding Screens (2/3) (1 AP) | No encounter. |
| 77 | Sitting Room Full of Folding Screens (3/3) (1 AP) | No encounter. Clear Reward: |
| 78 | Sitting Room Full of Wardrobes (1/4) | No encounter. |
| 79 | Sitting Room Full of Wardrobes (2/4) (1 AP) | No encounter. |
| 80 | Sitting Room Full of Wardrobes (3/4) (1 AP) | No encounter. |
| 81 | Sitting Room Full of Wardrobes (4/4) (5 AP) | 3 Servant Party Restriction Single wave with two Sabers (24-25k HP) and one Assassin (41k HP). Clear Reward: |
| 81NE -1 | Normal Sitting Room (1/3) | This branch is for obtaining No encounter. | |
| 81NE -2 | Normal Sitting Room (2/3) (1 AP) | No encounter. | |
| 81NE -3 | Normal Sitting Room (3/3) (5 AP) | 3 Servant Party Restriction Single wave with six Assassins (19-29k HP). Clear Reward: | |
| End of optional branch; continue from last branch point in steps below. | |||
| 81SW -1 | Safe Sitting Room (1/3) | No encounter. | |
| 81SW -2 | Safe Sitting Room (2/3) (1 AP) | No encounter. | |
| 81SW -3 | Safe Sitting Room (3/3) (5 AP) | 3 Servant Party Restriction Single wave with six Sabers (20-28k HP). Clear Reward: | |
| End of optional branch; continue from last branch point in steps below. | |||
| 82 | Dangerous Sitting Room (1/4) | Take the SE (Southeast) path. No encounter. |
| 83 | Dangerous Sitting Room (2/4) (1 AP) | No encounter. |
| 84 | Dangerous Sitting Room (3/4) (1 AP) | No encounter. |
| 85 | Dangerous Sitting Room (4/4) (1 AP) | No encounter. Clear Reward: |
| 86 | Suspicious Sitting Room | No encounter. |
| 87 | Lying Room (5 AP) | 3 Servant Party Restriction A large Caster mob (189k HP). Clear Reward: |
| 88 | Sitting Room without Handles (1/2) | No encounter. |
| 89 | Sitting Room without Handles (2/2) (1 AP) | No encounter. Clear Reward: |
| 89NE -1 | Tango-no-Sekku Decoration Sitting Room (1/3) | No encounter. | |
| 89NE -2 | Tango-no-Sekku Decoration Sitting Room (2/3) (1 AP) | No encounter. | |
| 89NE -3 | Tango-no-Sekku Decoration Sitting Room (3/3) (5 AP) | 3 Servant Party Restriction A single Archer mob (190k HP). Clear Reward: | |
| End of optional branch; continue from last branch point in steps below. | |||
| 90 | Moving Tatami Sitting Room (1/4) | Take the SE (Southeast) path. No encounter. | |
| 91 | Moving Tatami Sitting Room (2/4) (1 AP) | No encounter. | |
| 92 | Moving Tatami Sitting Room (3/4) (1 AP) | No encounter. | |
| 93 | Moving Tatami Sitting Room (4/4) (1 AP) | No encounter. Clear Reward: | |
| 94 | Sinister Sitting Room | No encounter. | |
| 95 | Act 3.4 (5 AP) | 3 Servant Party Restriction A single wave of four Assassins (19-27k HP) and a large Berserker (99k HP) that will start by debuffing the party's Buster, but helpfully buffs Quick and Arts. Story: Pre-battle ~3min read Post-battle ~4min read | |
| 96 | To 3rd Floor (1 AP) | No encounter. | |
| The 2nd Floor is complete! As before, any free quests / remaining exploration quests can be revisited any time throughout the duration of the event. Continue to Floor 3 below. | |||
Walkthrough - Floor 3 (Act 4) - 8/3/2022 21:00 PDT
| Quick Navigation | |||||
F1 | F2 | F3 | F4 | F5 | Act 7 |
F1 Post Act8 | F2 Post Act8 | F3 Post Act8 | F4 Post Act8 | F5 Post Act8 | Act 9 |
| # | Quest | Notes |
| 97 | Act 4.1 (0 AP) | Story only. Story: ~2min read |
| 97E -1 | Ocean-Smelling Corridor (1/3) | No encounter. | |
| 97E -2 | Ocean-Smelling Corridor (2/3) (1 AP) | No encounter. | |
| 97E -3 | Ocean-Smelling Corridor (3/3) (5 AP) | 3 Servant Party Restriction Single wave of four Archers (20-52k HP). Clear Reward: | |
| End of optional branch; continue from last branch point in steps below. | |||
| 98 | Strange-Smelling Corridor (1/3) | Take the W (West) path. No encounter. |
| 99 | Strange-Smelling Corridor (2/3) (1 AP) | No encounter. |
| 100 | Strange-Smelling Corridor (3/3) (1 AP) | No encounter. |
| 101 | Act 4.2 (5 AP) | 3 Servant Party Restriction Two break bar Servants, with an Assassin (50k,90k HP) that decreases debuff resist on break, and a Caster (62k,116k HP) that greatly decreases ATK and DEF for all [King] Servants on break. Story: Pre-battle ~6min read Post-battle ~4min read |
| 101W -1 | Lightly Scented Corridor (1/3) | No encounter. | |
| 101W -2 | Lightly Scented Corridor (2/3) (1 AP) | No encounter. | |
| 101W -3 | Lightly Scented Corridor (3/3) (5 AP) | 3 Servant Party Restriction Single wave of three Archers (17-52k HP). Clear Reward: | |
| End of optional branch; continue from last branch point in steps below. | |||
| 102 | Sweet-Smelling Corridor (1/5) | Take the E (East) path. No encounter. |
| 103 | Sweet-Smelling Corridor (2/5) (1 AP) | No encounter. |
| 104 | Sweet-Smelling Corridor (3/5) (1 AP) | No encounter. |
| 105 | Sweet-Smelling Corridor (4/5) (1 AP) | No encounter. |
| 106 | Sweet-Smelling Corridor (5/5) (1 AP) | No encounter. Clear Reward: |
| 107 | Dizzying Corridor | No encounter. |
| 108 | Act 4.3 (0 AP) | Story only. Story: ~7min read |
| 108N -1 | Blurry Vision Corridor (1/3) | No encounter. |
| 108N -2 | Blurry Vision Corridor (2/3) (1 AP) | No encounter. |
| 108N -3 | Blurry Vision Corridor (3/3) (5 AP) | 3 Servant Party Restriction Single wave with five Berserkers (33-36k HP). Clear Reward: |
| 108N -4 | Cloudy Vision Corridor (1/4) | No encounter. |
| 108N -5 | Cloudy Vision Corridor (2/4) (1 AP) | No encounter. |
| 108N -6 | Cloudy Vision Corridor (3/4) (1 AP) | No encounter. |
| 108N -7 | Cloudy Vision Corridor (4/4) (1 AP) | No encounter. Clear Reward: |
| 108N -8 | Vacant-Eyed Corridor (1/4) | No encounter. |
| 108N -9 | Vacant-Eyed Corridor (2/4) (1 AP) | No encounter. |
| 108N -10 | Vacant-Eyed Corridor (3/4) (1 AP) | No encounter. |
| 108N -11 | Vacant-Eyed Corridor (4/4) (5 AP) | 3 Servant Party Restriction Single wave with three Berserkers (27-53k HP). Clear Reward: |
| 109N -10W -1 | Passed Out Corridor (1/2) | No encounter. | |
| 109N -10W -2 | Passed Out Corridor (2/2) (1 AP) | No encounter. | |
| 109N -10W -3 | Act 4.x (0 AP) | Story only. Story: ~2min read | |
| End of optional branch; continue from last branch point in steps below. | |||
| 108N -12 | Tongue-Tied Corridor (1/3) | No encounter. |
| 108N -13 | Tongue-Tied Corridor (2/3) (1 AP) | No encounter. |
| 108N -14 | Tongue-Tied Corridor (3/3) (1 AP) | No encounter. Clear Reward: |
| 108N -15 | Twilight Room (1/2) | No encounter. |
| 108N -16 | Twilight Room (2/2) (5 AP) | 3 Servant Party Restriction Single wave with four Berserkers (43-46k HP). Clear Reward: |
| 108N -18 | Double-Looking Corridor (1/4) | No encounter. |
| 108N -19 | Double-Looking Corridor (2/4) (1 AP) | No encounter. |
| 108N -20 | Double-Looking Corridor (3/4) (1 AP) | No encounter. |
| 108N -21 | Double-Looking Corridor (4/4) (1 AP) | No encounter. Clear Reward: |
| 108N -21N -1 | Heartburn Corridor (1/3) | No encounter. | |
| 108N -21N -2 | Heartburn Corridor (2/3) (1 AP) | No encounter. | |
| 108N -21N -3 | Heartburn Corridor (3/3) (5 AP) | 3 Servant Party Restriction A single Rider mob (272k HP). Clear Reward: | |
| End of optional branch; continue from last branch point in steps below. | |||
| 108N -22 | Leaning Corridor (1/3) | No encounter. | |
| 108N -23 | Leaning Corridor (2/3) (1 AP) | No encounter. | |
| 108N -24 | Leaning Corridor (3/3) (1 AP) | No encounter. Clear Reward: | |
| 108N -25 | Squatting Corridor (1/3) | No encounter. | |
| 108N -26 | Squatting Corridor (2/3) (1 AP) | No encounter. | |
| 108N -27 | Squatting Corridor (3/3) (5 AP) | 3 Servant Party Restriction A single Caster mob (95k HP). Clear Reward: | |
| 108N -28 | Crawling Corridor (1/2) | No encounter. | |
| 108N -29 | Crawling Corridor (2/2) (5 AP) | 3 Servant Party Restriction A single Caster mob (96k HP). Clear Reward: | |
| End of alternate route; if this route is taken, can skip to Step 125 (or can continue below starting from the original branching point; steps 109-124 lead up to the same room). | |||
| 109 | Toasty Corridor (1/3) | Take the E (East) path. No encounter. |
| 110 | Toasty Corridor (2/3) (1 AP) | No encounter. |
| 111 | Toasty Corridor (3/3) (1 AP) | No encounter. Clear Reward: |
| 112 | Feel-Good Corridor (1/2) | No encounter. |
| 113 | Feel-Good Corridor (2/2) (1 AP) | No encounter. |
| 114 | Dusk Room (5 AP) | 3 Servant Party Restriction Single wave with four Lancers (31-33k HP). Clear Reward: |
| 115W -1 | Drowsy Corridor (1/3) | No encounter. | |
| 115W -2 | Drowsy Corridor (2/3) (1 AP) | No encounter. | |
| 115W -3 | Drowsy Corridor (3/3) (5 AP) | 3 Servant Party Restriction A single Caster mob (268k HP). Clear Reward: | |
| End of optional branch; continue from last branch point in steps below. | |||
| 115E -1 | Spaced-Out Corridor (1/3) | No encounter. | |
| 115E -2 | Spaced-Out Corridor (2/3) (1 AP) | No encounter. | |
| 115E -3 | Spaced-Out Corridor (3/3) (5 AP) | 3 Servant Party Restriction Single wave with three Lancers (22-52k HP). Clear Reward: | |
| End of optional branch; continue from last branch point in steps below. | |||
| 116 | Cheery Corridor (1/3) | Take the N (North) path. No encounter. |
| 117 | Cheery Corridor (2/3) (1 AP) | No encounter. |
| 118 | Cheery Corridor (3/3) (1 AP) | No encounter. Clear Reward: |
| 119 | Wavering Corridor (1/3) | No encounter. |
| 120 | Wavering Corridor (2/3) (1 AP) | No encounter. |
| 121 | Wavering Corridor (3/3) (1 AP) | No encounter. Clear Reward: |
| 121N -1 | Dizzying Corridor (1/3) | This branch is for obtaining No encounter. | |
| 121N -2 | Dizzying Corridor (2/3) (1 AP) | No encounter. | |
| 121N -3 | Dizzying Corridor (3/3) (1 AP) | No encounter. Clear Reward: | |
| 121N -4 | Snuggly Corridor (1/3) | No encounter. | |
| 121N -5 | Snuggly Corridor (2/3) (1 AP) | No encounter. | |
| 121N -6 | Snuggly Corridor (3/3) (5 AP) | 3 Servant Party Restriction A single Lancer mob (97k HP). Clear Reward: | |
| End of optional branch; continue from last branch point in steps below. | |||
| 122 | Drunken Stagger Corridor (1/3) | Take the W (West) path. No encounter. |
| 123 | Drunken Stagger Corridor (2/3) (1 AP) | No encounter. |
| 124 | Drunken Stagger Corridor (3/3) (1 AP) | No encounter. Clear Reward: |
| 125 | Wandering Maidservant A (5 AP) | 3 Servant Party Restriction A single Berserker (309k HP) that inflicts Disorder on all enemies (chance to Skill Seal each turn), and also has bonus DEF vs [Disorder] afflicted enemies. Story (Post-battle): ~1min read |
| 126 | Cheer-Inducing Corridor (1/2) | No encounter. |
| 127 | Cheer-Inducing Corridor (2/2) (1 AP) | No encounter. Clear Reward: |
| 127E -1 | Hazy Corridor (1/3) | No encounter. | |
| 127E -2 | Hazy Corridor (2/3) (1 AP) | No encounter. | |
| 127E -3 | Hazy Corridor (3/3) (1 AP) | No encounter. Clear Reward: | |
| 127E -4 | Might Faint Corridor (1/4) | No encounter. | |
| 127E -5 | Might Faint Corridor (2/4) (1 AP) | No encounter. | |
| 127E -6 | Might Faint Corridor (3/4) (1 AP) | No encounter. | |
| 127E -7 | Might Faint Corridor (4/4) (5 AP) | 3 Servant Party Restriction Single wave with three Riders (31-33k HP). Clear Reward: | |
| End of optional branch; continue from last branch point in steps below. | |||
| 128 | Want To Dance Corridor (1/5) | Take the W (West) path. No encounter. |
| 129 | Want To Dance Corridor (2/5) (1 AP) | No encounter. |
| 130 | Want To Dance Corridor (3/5) (1 AP) | No encounter. Clear Reward: |
| 131 | Want To Dance Corridor (4/5) | No encounter. |
| 132 | Want To Dance Corridor (5/5) (5 AP) | 3 Servant Party Restriction A large Archer mob (92k HP). Clear Reward: |
| 132W -1 | Heavy-Heart Corridor (1/2) | No encounter. | |
| 132W -2 | Heavy-Heart Corridor (2/2) (5 AP) | 3 Servant Party Restriction A single Saber mob (269k HP). Clear Reward: | |
| End of optional branch; continue from last branch point in steps below. | |||
| 132S -1 | Vomit-Inducing Corridor (1/3) | No encounter. | |
| 132S -2 | Vomit-Inducing Corridor (2/3) (1 AP) | No encounter. | |
| 132S -3 | Vomit-Inducing Corridor (3/3) (5 AP) | 3 Servant Party Restriction A large Lancer mob (96k HP). Clear Reward: | |
| End of optional branch; continue from last branch point in steps below. | |||
| 133 | Rapid Talking Corridor (1/2) | Take the N (North) path. No encounter. | |
| 134 | Rapid Talking Corridor (2/2) (1 AP) | No encounter. Clear Reward: | |
| 135 | Compelled To Lecture Corridor (1/2) | No encounter. | |
| 136 | Compelled To Lecture Corridor (2/2) (1 AP) | No encounter. | |
| 137 | Shinonome Room (5 AP) | 3 Servant Party Restriction A large Assassin mob (313k HP). Clear Reward: | |
| 138 | Burst Out Laughing Corridor (1/3) | No encounter. | |
| 139 | Burst Out Laughing Corridor (2/3) (1 AP) | No encounter. | |
| 140 | Burst Out Laughing Corridor (3/3) (1 AP) | No encounter. Clear Reward: | |
| 141 | Foment Corridor (1/3) | No encounter. | |
| 142 | Foment Corridor (2/3) (1 AP) | No encounter. | |
| 143 | Foment Corridor (3/3) (5 AP) | 3 Servant Party Restriction Single wave with two Assassins (4-31k HP) and an Archer (67k HP). Clear Reward: | |
| 144 | Choked Up Corridor (1/4) | No encounter. | |
| 145 | Choked Up Corridor (2/4) (1 AP) | No encounter. | |
| 146 | Choked Up Corridor (3/4) (1 AP) | No encounter. | |
| 147 | Choked Up Corridor (4/4) (1 AP) | No encounter. Clear Reward: | |
| 148 | Dawn Room | No encounter. | |
| 149 | Act 4.4 (5 AP) | 3 Servant Party Restriction A single wave with an Assassin (53k HP), a Caster (153k HP), and a Rider (122k HP). The Caster can inflict Disorder on all enemies (chance to Skill Seal each turn), and also has bonus DEF vs [Disorder] afflicted enemies. Story: Pre-battle ~4min read Post-battle ~1min read | |
| 150 | To 4th Floor (1 AP) | Story only. | |
| The 3rd Floor is complete! As before, any free quests / remaining exploration quests can be revisited any time throughout the duration of the event. Continue to Floor 4 below. | |||
Walkthrough - Floor 4 (Act 5) - 8/4/2022 21:00 PDT
| Quick Navigation | |||||
F1 | F2 | F3 | F4 | F5 | Act 7 |
F1 Post Act8 | F2 Post Act8 | F3 Post Act8 | F4 Post Act8 | F5 Post Act8 | Act 9 |
| # | Quest | Notes |
| 151 | Act 5.1 (0 AP) | Story only. Story: ~2min read |
| 151N -1 | Unlocked Corridor (1/3) | No encounter. | |
| 151N -2 | Unlocked Corridor (2/3) (1 AP) | No encounter. | |
| 151N -3 | Unlocked Corridor (3/3) (5 AP) | 3 Servant Party Restriction Single wave with two Casters (35-36k HP) and an Assassin (23k HP). Clear Reward: | |
| End of optional branch; continue from last branch point in steps below. | |||
| 151S -1 | Broken Lock Corridor (1/3) | No encounter. |
| 151S -2 | Broken Lock Corridor (2/3) (1 AP) | No encounter. |
| 151S -3 | Broken Lock Corridor (3/3) (1 AP) | No encounter. Clear Reward: |
| 151S -3E -1 | Corridor with Broken Door (1/3) | No encounter. | |
| 151S -3E -2 | Room with Broken Door (2/3) (1 AP) | No encounter. | |
| 151S -3E -3 | Corridor with Broken Door (3/3) (5 AP) | 3 Servant Party Restriction A large Saber mob (321k HP). Clear Reward: | |
| End of optional branch; continue from last branch point in steps below. | |||
| 151S -4 | Multiple Doors Corridor (1/3) | No encounter. | |
| 151S -5 | Multiple Doors Corridor (2/3) (1 AP) | No encounter. | |
| 151S -6 | Multiple Doors Corridor (3/3) (5 AP) | 3 Servant Party Restriction Single wave with six Casters (16-30k HP). Clear Reward: | |
| End of optional branch; continue from last branch point in steps below. | |||
| 152 | Multiple Closed Corridor | Take the E (East) path. 3 Servant Party Restriction Single wave with six Assassins (5-41k HP). |
| 153 | Act 5.2 (5 AP) | 3 Servant Party Restriction A single wave with three Assassins (90-163k HP). Story (Post-battle): ~5min read |
| 153N -1 | Corridor with too Much Stuff (1/2) | No encounter. | |
| 153N -2 | Room with too Much Stuff (2/2) (1 AP) | No encounter. | |
| 153N -3 | Act 5.x (0 AP) | Story only. Story: ~3min read | |
| End of optional branch; continue from last branch point in steps below. | |||
| 154 | Corridor with Clocks (1/4) | Take the S (South) path. 3 Servant Party Restriction Single wave with six Casters (15-31k HP). |
| 155 | Corridor with Clocks (2/4) (1 AP) | No encounter. |
| 156 | Room with Clocks (3/4) (1 AP) | No encounter. |
| 157 | Room with Clocks (4/4) (1 AP) | No encounter. Clear Reward: |
| 157E -1 | Room Full of Boxes (1/6) | No encounter. |
| 157E -2 | Room Full of Boxes (2/6) (1 AP) | No encounter. |
| 157E -3 | Room Full of Boxes (3/6) (5 AP) | 3 Servant Party Restriction Single wave with six Archers (13-58k HP). Clear Reward: |
| 157E -4 | Room Full of Boxes (4/6) | No encounter. |
| 157E -5 | Room Full of Boxes (5/6) (1 AP) | No encounter. |
| 157E -6 | Room Full of Boxes (6/6) (1 AP) | No encounter. Clear Reward: |
| 157E -6W -1 | Corridor with Treasure Mark (1/3) | No encounter. | |
| 157E -6W -2 | Corridor with Treasure Mark (2/3) (1 AP) | No encounter. | |
| 157E -6W -3 | Corridor with Treasure Mark (3/3) (5 AP) | 3 Servant Party Restriction Three waves, each with three Archers (7-34k HP). Clear Reward: | |
| End of optional branch; continue from last branch point in steps below. | |||
| 157E -7 | Corridor of Cogs (1/3) | Take the E (East) path. No encounter. |
| 157E -8 | Room of Cogs (2/3) (1 AP) | No encounter. |
| 157E -9 | Room of Cogs (3/3) (1 AP) | No encounter. Clear Reward: |
| 157E -9S -1 | Automatic Door Corridor (1/2) | No encounter. | |
| 157E -9S -2 | Automatic Door Corridor (2/2) (5 AP) | 3 Servant Party Restriction A large Rider mob (323k HP). Clear Reward: | |
| End of optional branch; continue from last branch point in steps below. | |||
| 157E -10 | Corridor with Holes (1/3) | Take the E (East) path. No encounter. | |
| 157E -11 | Corridor with Holes (2/3) (1 AP) | No encounter. | |
| 157E -12 | Corridor with Holes (3/3) (1 AP) | No encounter. Clear Reward: | |
| 157E -13 | Boiling Pot Room (1/2) | No encounter. | |
| 157E -14 | Boiling Pot Room (2/2) (5 AP) | 3 Servant Party Restriction Single wave with six Sabers (21-28k HP). Clear Reward: | |
| 157E -16 | Tatami Changing Room (1/3) | No encounter. | |
| 157E -17 | Tatami Changing Room (2/3) (1 AP) | No encounter. | |
| 157E -18 | Tatami Changing Room (3/3) (1 AP) | No encounter. Clear Reward: | |
| 157E -19 | Storage Room Corridor (1/7) | No encounter. | |
| 157E -20 | Storage Room Corridor (2/7) (1 AP) | No encounter. | |
| 157E -21 | Storage Room Corridor (3/7) (5 AP) | 3 Servant Party Restriction Single wave with two Archers (28-30k HP), and a Saber (38k HP). Clear Reward: | |
| 157E -22 | Storage Room Corridor (4/7) | No encounter. | |
| 157E -23 | Storage Room Corridor (5/7) (1 AP) | No encounter. | |
| 157E -24 | Storage Room Corridor (6/7) (1 AP) | No encounter. | |
| 157E -25 | Storage Room Corridor (7/7) (5 AP) | 3 Servant Party Restriction Single wave with three Sabers (28-40k HP). Clear Reward: | |
| End of alternate route; if this route is taken, can skip to Step 172 (or can continue below starting from the original branching point; steps 158-171 lead up to the same room). | |||
| 158 | Gimmicky Corridor (1/3) | Take the S (South) path. No encounter. |
| 159 | Gimmicky Corridor (2/3) (1 AP) | No encounter. |
| 160 | Gimmicky Corridor (3/3) (1 AP) | No encounter. Clear Reward: |
| 161 | Corridor with Bookshelves (1/3) | 3 Servant Party Restriction Single wave with six Casters (16-29k HP). |
| 162 | Room with Bookshelves (2/3) (1 AP) | No encounter. |
| 163 | Room with Bookshelves (3/3) (1 AP) | No encounter. Clear Reward: |
| 164E -1 | Corridor Buried in Books (1/2) | No encounter. | |
| 164E -2 | Room Buried in Books (2/2) (5 AP) | 3 Servant Party Restriction Single wave with six Casters (18-30k HP). Clear Reward: | |
| End of optional branch; continue from last branch point in steps below. | |||
| 164S -1 | Corridor with Rocks (1/3) | No encounter. | |
| 164S -2 | Corridor with Rocks (2/3) (1 AP) | No encounter. | |
| 164S -3 | Corridor with Rocks (3/3) (5 AP) | 3 Servant Party Restriction Single wave with two chunky Caster mobs (125k, 203k HP). Clear Reward: | |
| End of optional branch; continue from last branch point in steps below. | |||
| 165 | Doujin Corridor (1/3) | Take the W (West) path. No encounter. |
| 166 | Doujin Room (2/3) (1 AP) | No encounter. |
| 167 | Doujin Room (3/3) (1 AP) | No encounter. Clear Reward: |
| 168 | Corridor with Pictures (1/4) | 3 Servant Party Restriction Single wave with two Casters (28-33k HP) and an Assassin (20k HP). |
| 169 | Corridor with Pictures (2/4) (1 AP) | No encounter. |
| 170 | Corridor with Pictures (3/4) (1 AP) | No encounter. |
| 171 | Corridor with Pictures (4/4) (1 AP) | No encounter. Clear Reward: |
| 172 | Wandering Maidservant B (5 AP) | 3 Servant Party Restriction Single large Caster (344k HP) with permanent NP Strength, DEF, and ATK buffs. Note a random frontline Servant will gain the ability to steal one of the starting buffs when normal attacking, starting with NP Strength (3rd turn), DEF (6th turn), and then ATK (9th turn). Story (Post-battle): ~1min read |
| 173 | Corridor Full of Keyholes (1/3) | No encounter. |
| 174 | Room Full of Keyholes (2/3) (1 AP) | No encounter. |
| 175 | Corridor Full of Keyholes (3/3) (1 AP) | No encounter. Clear Reward: |
| 175S -1 | Scribble Corridor (1/3) | No encounter. | |
| 175S -2 | Scribble Corridor (2/3) (1 AP) | No encounter. | |
| 175S -3 | Scribble Corridor (3/3) (5 AP) | 3 Servant Party Restriction A large Caster mob (324k HP). Clear Reward: | |
| End of optional branch; continue from last branch point in steps below. | |||
| 176 | Wooden Stick Corridor (1/3) | Take the E (East) path. No encounter. |
| 177 | Wooden Stick Corridor (2/3) (1 AP) | No encounter. |
| 178 | Wooden Stick Corridor (3/3) (1 AP) | No encounter. Clear Reward: |
| 179 | Corridor of Binding (1/3) | No encounter. |
| 180 | Corridor of Binding (2/3) (1 AP) | No encounter. |
| 181 | Corridor of Binding (3/3) (1 AP) | No encounter. Clear Reward: |
| 181E -1 | Prison Corridor (1/4) | This branch is for obtaining No encounter. | |
| 181E -2 | Prison Room (2/4) (1 AP) | No encounter. | |
| 181E -3 | Prison Room (3/4) (1 AP) | No encounter. | |
| 181E -4 | Prison Corridor (4/4) (5 AP) | 3 Servant Party Restriction Single wave with six Berserkers (21-25k HP). Clear Reward: | |
| End of optional branch; continue from last branch point in steps below. | |||
| 182 | Shrine Style Corridor (1/4) | Take the N (North) path. No encounter. |
| 183 | Shrine Style Corridor (2/4) (1 AP) | No encounter. |
| 184 | Shrine Style Corridor (3/4) (1 AP) | No encounter. |
| 185 | Shrine Style Room (4/4) (1 AP) | No encounter. Clear Reward: |
| 186 | Hawk Room (1/2) | No encounter. |
| 187 | Hawk Room (2/2) (5 AP) | 3 Servant Party Restriction Beware a break bar encounter versus a Rider (180k, 230k HP)! Bring strong single target Assassins. The boss starts with unremovable NP, DEF, and ATK buffs. They can also decrease the party's NP Gauge by 10% and Stars by 10 with a skill. Helpfully, on the 3rd and 6th turn, a single frontliner will gain a buff that can steal the enemy's NP Strength (3rd turn) and DEF (6th turn) buff when normal attacking. The boss will remove buffs from all enemies and buff its own DEF on break. Clear Reward: |
| 187W-1 | Offering Room (1/2) | No encounter. | |
| 187W-2 | Offering Room (2/2) (5 AP) | 3 Servant Party Restriction A single Berserker mob (100k HP). Clear Reward: | |
| End of optional branch; continue from last branch point in steps below. | |||
| 188 | Two-Timing Corridor (1/2) | Take the N (North) path. No encounter. |
| 189 | ??? (0 AP) | Story only. Story: ~1min read |
| 190 | Two-Timing Corridor (2/2) (1 AP) | No encounter. Clear Reward: |
| 191 | Collapsed Corridor (1/3) | 3 Servant Party Restriction Single wave with two Assassins (24-25k HP) and a Berserker (39k HP). |
| 192 | Collapsed Room (2/3) (1 AP) | No encounter. |
| 193 | Collapsed Room (3/3) (1 AP) | No encounter. Clear Reward: |
| 193E -1 | Slurry Corridor (1/5) | No encounter. | |
| 193E -2 | Slurry Room (2/5) (1 AP) | No encounter. | |
| 193E -3 | Slurry Corridor (3/5) (1 AP) | No encounter. Clear Reward: | |
| 193E -4 | Slurry Corridor (4/5) | No encounter. | |
| 193E -5 | Slurry Corridor (5/5) (5 AP) | 3 Servant Party Restriction Single wave with six Berserkers (21-26k HP). Clear Reward: | |
| End of optional branch; continue from last branch point in steps below. | |||
| 194 | Vending Machine Corridor (1/3) | Take the SE (Southeast) path. No encounter. | |
| 195 | Vending Machine Corridor (2/3) (1 AP) | No encounter. | |
| 196 | Vending Machine Corridor (3/3) (1 AP) | No encounter. Clear Reward: | |
| 197 | Eagle Room | No encounter. | |
| 198 | Act 5.3 (5 AP) | 3 Servant Party Restriction A single wave with an Assassin mob (147k HP) that gains 1 NP charge per turn, and a break bar Assassin Servant (142k, 223k HP) that has increased Crit Rate and will gain 1 NP charge and class advantage vs Alter Egos upon break. Story: Pre-battle ~5min read Post-battle ~4min read | |
| 199 | To 5th Floor (1 AP) | No encounter. | |
| The 4th Floor is complete! As before, any free quests / remaining exploration quests can be revisited any time throughout the duration of the event. Continue to Floor 5 below. | |||
Walkthrough - Floor 5 (Act 6) - 8/5/2022 21:00 PDT
| Quick Navigation | |||||
F1 | F2 | F3 | F4 | F5 | Act 7 |
F1 Post Act8 | F2 Post Act8 | F3 Post Act8 | F4 Post Act8 | F5 Post Act8 | Act 9 |
| # | Quest | Notes |
| 200 | Act 6.1 (0 AP) | Story only. Story: ~1min read |
| 200N -1 | Passionate Corridor (1/3) | No encounter. | |
| 200N -2 | Passionate Room (2/3) (1 AP) | No encounter. | |
| 200N -3 | Passionate Room (3/3) (1 AP) | No encounter. Clear Reward: | |
| 200N -4 | Inflamed Room (1/3) | No encounter. | |
| 200N -5 | Inflamed Room (2/3) (1 AP) | No encounter. | |
| 200N -6 | Inflamed Room (3/3) (5 AP) | 3 Servant Party Restriction Single wave with three Casters (56-73k HP). Clear Reward: | |
| End of optional branch; continue from last branch point in steps below. | |||
| 201 | Seductive Corridor (1/3) | Take the S (South) path. No encounter. |
| 202 | Seductive Corridor (2/3) (1 AP) | No encounter. |
| 203 | Seductive Corridor (3/3) (5 AP) | 3 Servant Party Restriction Single wave with four Assassins (19-25k HP). Clear Reward: |
| 203W -1 | Glossy Corridor (1/3) | No encounter. | |
| 203W -2 | Glossy Room (2/3) (1 AP) | No encounter. | |
| 203W -3 | Glossy Room (3/3) (1 AP) | No encounter. Clear Reward: | |
| 203W -4 | Gooey Corridor (1/3) | No encounter. | |
| 203W -5 | Gooey Room (2/3) (1 AP) | No encounter. | |
| 203W -6 | Gooey Room (3/3) (5 AP) | 3 Servant Party Restriction Single wave with three Casters (26-41k HP). Clear Reward: | |
| End of optional branch; continue from last branch point in steps below. | |||
| 204 | Fragrant Corridor | Take the S (South) path. No encounter. |
| 205 | Sakura Room (1 AP) | No encounter. |
| 206 | Act 6.2 (5 AP) | 3 Servant Party Restriction A single wave with two normal Assassin mobs (59k, 78k HP) and two Assassin Servants (105k, 133k HP). The Servants will use an extra attack as their charge move, and have a skill that can Charm a target. Story: ~1min read |
| 206W -1 | Endearing Corridor (1/2) | No encounter. | |
| 206W -2 | Endearing Corridor (2/2) (1 AP) | No encounter. | |
| 206W -3 | Act 6.x (0 AP) | Story only. Story: ~2min read | |
| End of optional branch; continue from last branch point in steps below. | |||
| 207 | Charming Corridor (1/3) | Take the S (South) path. No encounter. |
| 208 | Charming Corridor (2/3) (1 AP) | No encounter. |
| 209 | Charming Corridor (3/3) (5 AP) | 3 Servant Party Restriction Single wave with two Casters (17-18k HP) and an Assassin Servant (60k HP). Clear Reward: |
| 210 | Bewitching Corridor (1/4) | No encounter. |
| 211 | Bewitching Corridor (2/4) (1 AP) | No encounter. |
| 212 | Bewitching Corridor (3/4) (1 AP) | No encounter. |
| 213 | Bewitching Corridor (4/4) (1 AP) | No encounter. Clear Reward: |
| 214 | Room of Mystification (1/2) | No encounter. |
| 215 | Room of Mystification (2/2) (5 AP) | 3 Servant Party Restriction Single wave with two Casters (17-18k HP) and an Assassin Servant (60k HP). Clear Reward: |
| 215NE -1 | Spellbinding Corridor (1/3) | No encounter. |
| 215NE -2 | Spellbinding Corridor (2/3) (1 AP) | No encounter. |
| 215NE -3 | Spellbinding Corridor (3/3) (1 AP) | No encounter. Clear Reward: |
| 215NE -4 | Excited Corridor (1/2) | No encounter. |
| 215NE -5 | Excited Corridor (2/2) (5 AP) | 3 Servant Party Restriction Single wave with three Assassins (17-60k HP). Clear Reward: |
| 215NE -5NE -1 | Writhing Corridor (1/3) | No encounter. | |
| 215NE -5NE -2 | Writhing Corridor (2/3) (1 AP) | No encounter. | |
| 215NE -5NE -3 | Writhing Corridor (3/3) (1 AP) | No encounter. Clear Reward: | |
| 215NE -5NE -4 | Shrinking Back Corridor (1/2) | No encounter. | |
| 215NE -5NE -5 | Shrinking Back Room (2/2) (5 AP) | 3 Servant Party Restriction Single wave with six Assassins (18-30k HP). Clear Reward: | |
| End of optional branch; continue from last branch point in steps below. | |||
| 215NE -6 | Explicit Corridor (1/3) | Take the NW (Northwest) path. No encounter. |
| 215NE -7 | Explicit Corridor (2/3) (1 AP) | No encounter. |
| 215NE -8 | Explicit Corridor (3/3) (1 AP) | No encounter. Clear Reward: |
| 215NE -8S -1 | Lively Corridor (1/3) | No encounter. | |
| 215NE -8S -2 | Lively Corridor (2/3) (1 AP) | No encounter. | |
| 215NE -8S -3 | Lively Room (3/3) (1 AP) | No encounter. Clear Reward: | |
| End of optional branch; continue from last branch point in steps below. | |||
| 215NE -9 | Lie Together Corridor (1/2) | Take the W (West) path. No encounter. |
| 215NE -10 | Lie Together Room (2/2) (1 AP) | No encounter. Clear Reward: |
| 215NE -11 | Rendezvous Corridor (1/3) | No encounter. |
| 215NE -12 | Rendezvous Room (2/3) (1 AP) | No encounter. |
| 215NE -13 | Rendezvous Room (3/3) (5 AP) | 3 Servant Party Restriction Single wave with two Berserkers (17-18k HP) and an Assassin Servant (60k HP). Clear Reward: |
| 215NE -13S -1 | Fruitful Corridor (1/3) | No encounter. | |
| 215NE -13S -2 | Fruitful Corridor (2/3) (1 AP) | No encounter. | |
| 215NE -13S -3 | Fruitful Corridor (3/3) (1 AP) | No encounter. Clear Reward: | |
| End of optional branch; continue from last branch point in steps below. | |||
| 215NE -14 | Alluring Corridor (1/4) | Take the W (West) path. No encounter. | |
| 215NE -15 | Alluring Room (2/4) (1 AP) | No encounter. | |
| 215NE -16 | Alluring Room (3/4) (1 AP) | No encounter. | |
| 215NE -17 | Alluring Corridor (4/4) (5 AP) | 3 Servant Party Restriction Single wave with a Caster (64k HP) and an Assassin Servant (126k HP). Clear Reward: | |
| End of alternate route; if this route is taken, can skip to Step 230 (or can continue below starting from the original branching point; steps 215-229 lead up to the same room). | |||
| 215SW -1 | Body Temp Corridor (1/3) | No encounter. |
| 215SW -2 | Body Temp Corridor (2/3) (1 AP) | No encounter. |
| 215SW -3 | Body Temp Room (3/3) (5 AP) | 3 Servant Party Restriction A single Caster mob (97k HP). Clear Reward: |
| 215SW -3W -1 | Flushed Body Corridor (1/3) | No encounter. | |
| 215SW -3W -2 | Flushed Body Room (2/3) (1 AP) | No encounter. | |
| 215SW -3W -3 | Flushed Body Room (3/3) (1 AP) | No encounter. Clear Reward: | |
| 215SW -3W -4 | Consumed with Passion Corridor (1/3) | No encounter. | |
| 215SW -3W -5 | Consumed with Passion Corridor (2/3) (1 AP) | No encounter. | |
| 215SW -3W -6 | Consumed with Passion Corridor (3/3) (5 AP) | 3 Servant Party Restriction Single wave with two Assassins (19-22k HP) and a Caster (55k HP). Clear Reward: | |
| End of optional branch; continue from last branch point in steps below. | |||
| 215SW -4 | Hateful Corridor (1/3) | Take the S (South) path. No encounter. |
| 215SW -5 | Hateful Corridor (2/3) (1 AP) | No encounter. |
| 215SW -6 | Hateful Corridor (3/3) (1 AP) | No encounter. Clear Reward: |
| 215SW -6E -1 | Moody Corridor (1/3) | No encounter. | |
| 215SW -6E -2 | Moody Room (2/3) (1 AP) | No encounter. | |
| 215SW -6E -3 | Moody Room (3/3) (5 AP) | 3 Servant Party Restriction A single Caster mob (191k HP). Clear Reward: | |
| End of optional branch; continue from last branch point in steps below. | |||
| 215SW -7 | Muscular Corridor (1/3) | Take the W (West) path. No encounter. |
| 215SW -8 | Muscular Corridor (2/3) (1 AP) | No encounter. |
| 215SW -9 | Muscular Corridor (3/3) (1 AP) | No encounter. Clear Reward: |
| 215SW -10 | Bursting Corridor (1/2) | No encounter. |
| 215SW -11 | Bursting Room (2/2) (5 AP) | 3 Servant Party Restriction Single wave with three Shadow Servants: Rider (28k), Saber (36k), and Assassin (31k HP). Clear Reward: |
| 215SW -12N -1 | Corridor That Crosses the Line (1/2) | No encounter. | |
| 215SW -12N -2 | Room That Crosses the Line (2/2) (5 AP) | 3 Servant Party Restriction Single wave with three Shadow Servants: Caster (35k), Caster (29k), and Assassin (31k HP). Clear Reward: | |
| End of optional branch; continue from last branch point in steps below. | |||
| 215SW -13 | Room That Goes Upstairs (1/3) | No encounter. | |
| 215SW -14 | Room That Goes Upstairs (2/3) (1 AP) | No encounter. | |
| 215SW -15 | Room That Goes Upstairs (3/3) (1 AP) | No encounter. Clear Reward: | |
| 215SW -16 | Corridor To Mature (1/2) | No encounter. | |
| 215SW -17 | Corridor To Mature (2/2) (5 AP) | 3 Servant Party Restriction Single wave with three Shadow Servants: Berserker (31k), Archer (30k), and Assassin (34k HP). Clear Reward: | |
| End of alternate route; if this route is taken, can skip to Step 230 (or can continue below starting from the original branching point; steps 215-229 lead up to the same room). | |||
| 216 | Sweet Corridor (1/3) | Take the NW (Northwest) path. No encounter. |
| 217 | Sweet Room (2/3) (1 AP) | No encounter. |
| 218 | Sweet Room (3/3) (5 AP) | 3 Servant Party Restriction Single wave with three Assassins (17-60k HP). Clear Reward: |
| 218N -1 | Curious Corridor (1/3) | No encounter. | |
| 218N -2 | Curious Room (2/3) (1 AP) | No encounter. | |
| 218N -3 | Curious Room (3/3) (1 AP) | No encounter. Clear Reward: | |
| End of optional branch; continue from last branch point in steps below. | |||
| 219 | Impatient Corridor (1/3) | Take the W (West) path. No encounter. |
| 220 | Impatient Corridor (2/3) (1 AP) | No encounter. |
| 221 | Impatient Corridor (3/3) (5 AP) | 3 Servant Party Restriction Single wave with two Assassin Servants (44-51k HP). Clear Reward: |
| 222W -1 | Attractive Corridor (1/3) | No encounter. | |
| 222W -2 | Attractive Room (2/3) (1 AP) | No encounter. | |
| 222W -3 | Attractive Room (3/3) (5 AP) | 3 Servant Party Restriction A single Caster mob (189k HP). Clear Reward: | |
| End of optional branch; continue from last branch point in steps below. | |||
| 223 | Melting Corridor (1/3) | Take the N (North) path. No encounter. | |
| 224 | Melting Room (2/3) (1 AP) | No encounter. | |
| 225 | Melting Corridor (3/3) (1 AP) | No encounter. Clear Reward: | |
| 226 | Blistered Corridor (1/4) | No encounter. | |
| 227 | Blistered Corridor (2/4) (1 AP) | No encounter. | |
| 228 | Blistered Corridor (3/4) (1 AP) | No encounter. | |
| 229 | Blistered Corridor (4/4) (5 AP) | 3 Servant Party Restriction Single wave with three Assassin Servants (25-44k HP). Clear Reward: | |
| 230 | Act 6.3 (5 AP) | 3 Servant Party Restriction A single wave with a large Berserker (220k HP) that can inflict a 2-turn Charm and deals bonus damage against Charmed enemies, and two Assassin Servants (71k, 91k HP) that can also inflict Charm. Nuke the wave down as quickly as possible! Story: Pre-battle ~4min read Post-battle ~3min read | |
| 231 | Enchanting Corridor (1/5) | No encounter. | |
| 232 | Enchanting Corridor (2/5) (1 AP) | No encounter. | |
| 233 | Enchanting Room (3/5) (1 AP) | No encounter. | |
| 234 | Enchanting Corridor (4/5) (1 AP) | No encounter. | |
| 235 | Enchanting Room (5/5) (1 AP) | No encounter. Clear Reward: | |
| 236 | Dreamy Hallway (1/2) | No encounter. | |
| 237 | Dreamy Hallway (2/2) (1 AP) | No encounter. Clear Reward: | |
| 238 | To Bottom Floor (1 AP) | No encounter. | |
| The 5th Floor is complete! As before, any free quests / remaining exploration quests can be revisited any time throughout the duration of the event. Act 7 continues below. | |||
Walkthrough - Act 7-8
| Quick Navigation | |||||
F1 | F2 | F3 | F4 | F5 | Act 7 |
F1 Post Act8 | F2 Post Act8 | F3 Post Act8 | F4 Post Act8 | F5 Post Act8 | Act 9 |
| # | Quest | Notes | |
| 239 | Act 7-1 (5 AP) | 3 Servant Party Restriction A break bar Assassin Servant (191k, 292k HP) that can decrease ATK and Charm Resist for the frontline upon break. Story: Pre-battle ~9min read Post-battle ~1min read | |
| 240 | Act 7-2 (0 AP) | Story only. Story: ~6min read | |
| 241 | Act 7-3 (5 AP) | 3 Servant Party Restriction Deplete the boss's first HP bar (315k HP) to finish the encounter! The boss is weak against (x1.2) Alter Ego and Foreigner classes, and takes neutral damage from all others. Unremovable ATK, DEF, Crit Strength, and Debuff Resist debuffs will be applied to the Master's party at the start of battle, and all party members will take 1000 HP damage per turn. Beware that the boss has the ability to charge their NP bar by 1, and can inflict AoE NP Seal, Skill Seal, and Charm. Their NP is single target, but has high Charm chance. Strong single target Servants, preferably of Alter Ego or Foreigner class, can be used with NP Gauge support to burst her down quickly. Story: Pre-battle ~4min read Post-battle ~3min read | |
| 242 | Act 7-4 (0 AP) | Story only. Story: ~8min read | |
| 243 | Act 8-1 (0 AP) | This quest is back at the entrance on 1F. Story only. Story: ~5min read | |
| 244 | Act 8-2 (0 AP) | Story only. Story: ~5min read | |
| Post-Act 8 nodes will now open on each floor! This includes the best Free Quest nodes to farm. These can be cleared out while waiting for the next Act to open. If it is already past the time gate and Masters wish to skip to the next part of the main story, make sure to have at least 5 | |||
Walkthrough - Floor 1 (Post-Act 8)
| Quick Navigation | |||||
F1 | F2 | F3 | F4 | F5 | Act 7 |
F1 Post Act8 | F2 Post Act8 | F3 Post Act8 | F4 Post Act8 | F5 Post Act8 | Act 9 |
| To help make the final boss easier, Masters may wish to prioritize routes that have |
| 1F -SW -1 | Corridor behind the Hanging Scroll (1/2) | No encounter. | |
| 1F -SW -2 | Corridor behind the Hanging Scroll (2/2) (1 AP) | No encounter. | |
| 1F -SW -3 | Bat Room (5 AP) | 3 Servant Party Restriction Single wave with four Riders (13-14k HP) and an Assassin (42k HP). Clear Reward: | |
| End of optional branch; continue from last branch point in steps below. | |||
| 1F -NW -1 | Corridor behind the Wall (1/6) | No encounter. | |
| 1F -NW -2 | Corridor behind the Wall (2/6) (1 AP) | No encounter. | |
| 1F -NW -3 | Corridor behind the Wall (3/6) (1 AP) | No encounter. Clear Reward: | |
| 1F -NW -4 | Corridor behind the Wall (4/6) | No encounter. | |
| 1F -NW -5 | Corridor behind the Wall (5/6) (1 AP) | No encounter. | |
| 1F -NW -6 | Corridor behind the Wall (6/6) (1 AP) | No encounter. | |
| 1F -NW -7 | Mole Room (5 AP) | 3 Servant Party Restriction Single wave with four Lancers (12-14k HP) and an Assassin (43k HP). Clear Reward: | |
| End of optional branch; continue from last branch point in steps below. | |||
| 1F -SE -1 | Corridor behind the Folding Screen | No encounter. | |
| 1F -SE -2 | Mosquito Room (5 AP) | 3 Servant Party Restriction Single wave with an Assassin (48k HP) and five Riders (18-20k HP). Clear Reward: | |
| End of optional branch; continue from last branch point in steps below. | |||
| 1F -NE -1 | Corridor behind the Fusuma (1/4) | No encounter. | |
| 1F -NE -2 | Corridor behind the Fusuma (2/4) (1 AP) | No encounter. | |
| 1F -NE -3 | Corridor behind the Fusuma (3/4) (1 AP) | No encounter. | |
| 1F -NE -4 | Corridor behind the Fusuma (4/4) (1 AP) | No encounter. | |
| 1F -NE -5 | Dragon Room (5 AP) | 3 Servant Party Restriction A large Rider mob (98k HP). Clear Reward: | |
| End of optional branch; continue from last branch point in steps below. | |||
Walkthrough - Floor 2 (Post-Act 8)
| Quick Navigation | |||||
F1 | F2 | F3 | F4 | F5 | Act 7 |
F1 Post Act8 | F2 Post Act8 | F3 Post Act8 | F4 Post Act8 | F5 Post Act8 | Act 9 |

| 2F -NW -1 | Sitting Room That Looks Like Walls (1/3) | No encounter. | |
| 2F -NW -2 | Sitting Room That Looks Like Walls (2/3) (1 AP) | No encounter. | |
| 2F -NW -3 | Sitting Room That Looks Like Walls (3/3) (5 AP) | 3 Servant Party Restriction Single wave with four Assassins (20-29k HP). Clear Reward: | |
| End of optional branch; continue from last branch point in steps below. | |||
| 2F -SW -1 | Iron Door Sitting Room (1/4) | No encounter. | |
| 2F -SW -2 | Iron Door Sitting Room (2/4) (1 AP) | No encounter. | |
| 2F -SW -3 | Iron Door Sitting Room (3/4) (1 AP) | No encounter. | |
| 2F -SW -4 | Iron Door Sitting Room (4/4) (5 AP) | 3 Servant Party Restriction Single wave with four Assassins (21-27k HP). Clear Reward: | |
| End of optional branch; continue from last branch point in steps below. | |||
| 2F -M -1 | Bumper Crop Sitting Room (1/2) | No encounter. | |
| 2F -M -2 | Bumper Crop Sitting Room (2/2) (5 AP) | 3 Servant Party Restriction Single wave with four Casters (21-27k HP). Clear Reward: | |
| End of optional branch; continue from last branch point in steps below. | |||
| 2F -E -1 | Pumpkin-Patterned Sitting Room (1/7) | No encounter. | |
| 2F -E -2 | Pumpkin-Patterned Sitting Room (2/7) (1 AP) | No encounter. | |
| 2F -E -3 | Pumpkin-Patterned Sitting Room (3/7) (1 AP) | No encounter. | |
| 2F -E -4 | Pumpkin-Patterned Sitting Room (4/7) (1 AP) | No encounter. Clear Reward: | |
| 2F -E -5 | Pumpkin-Patterned Sitting Room (5/7) | No encounter. | |
| 2F -E -6 | Pumpkin-Patterned Sitting Room (6/7) (1 AP) | No encounter. | |
| 2F -E -7 | Pumpkin-Patterned Sitting Room (7/7) (5 AP) | 3 Servant Party Restriction Single wave with a Saber (16k), two Lancers (19-23k), and two Archers (16-21k HP). Clear Reward: | |
| End of optional branch; continue from last branch point in steps below. | |||
Walkthrough - Floor 3 (Post-Act 8)
| Quick Navigation | |||||
F1 | F2 | F3 | F4 | F5 | Act 7 |
F1 Post Act8 | F2 Post Act8 | F3 Post Act8 | F4 Post Act8 | F5 Post Act8 | Act 9 |

| 3F -N -1 | Awakened Sixth Sense Corridor (1/2) | No encounter. | |
| 3F -N -2 | Awakened Sixth Sense Corridor (2/2) (5 AP) | 3 Servant Party Restriction A single Saber mob (97k HP). Clear Reward: | |
| End of optional branch; continue from last branch point in steps below. | |||
| 3F -SE -1 | Amnesia Corridor (1/2) | No encounter. | |
| 3F -SE -2 | Amnesia Corridor (2/2) (5 AP) | 3 Servant Party Restriction A single Rider mob (96k HP). Clear Reward: | |
| End of optional branch; continue from last branch point in steps below. | |||
| 3F -SW -1 | Enlightenment Corridor (1/3) | No encounter. | |
| 3F -SW -2 | Enlightenment Corridor (2/3) (1 AP) | No encounter. | |
| 3F -SW -3 | Enlightenment Corridor (3/3) (5 AP) | 3 Servant Party Restriction A single Caster mob (96k HP). Clear Reward: | |
| End of optional branch; continue from last branch point in steps below. | |||
| 3F -NW -1 | Perpetually Dark Room (1/2) | No encounter. | |
| 3F -NW -2 | Perpetually Dark Room (2/2) (5 AP) | 3 Servant Party Restriction A single Berserker mob (106k HP). Clear Reward: | |
| End of optional branch; continue from last branch point in steps below. | |||
Walkthrough - Floor 4 (Post-Act 8)
| Quick Navigation | |||||
F1 | F2 | F3 | F4 | F5 | Act 7 |
F1 Post Act8 | F2 Post Act8 | F3 Post Act8 | F4 Post Act8 | F5 Post Act8 | Act 9 |
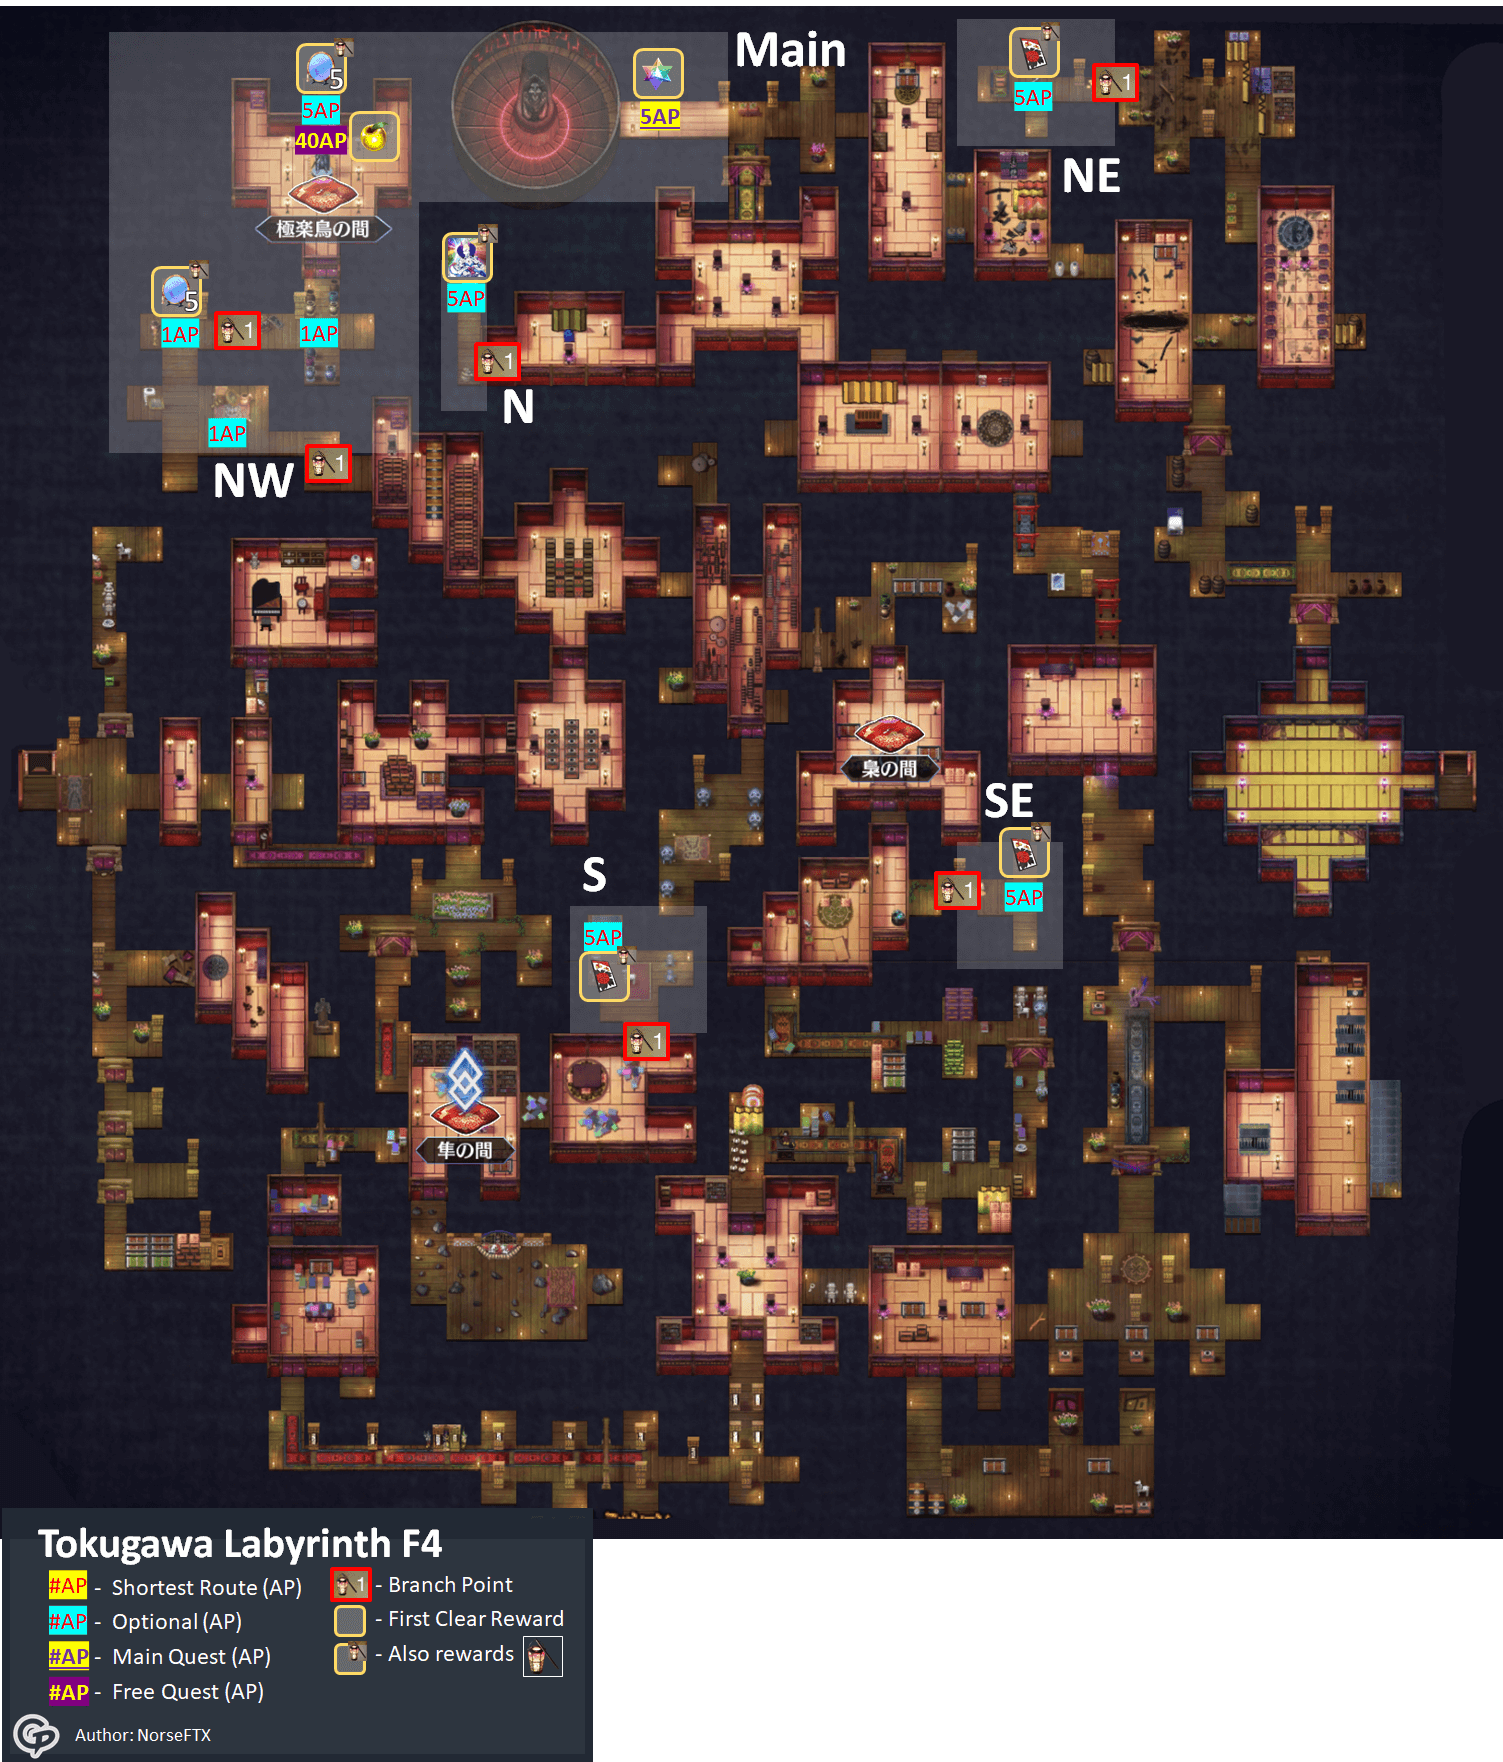
| The "Main" branch up north will not appear until the time gate opens on ~Day 7 of the Event. This floor is where the next Main Quest will appear. All other branches will be available before the time gate after Act 8. |
| 4F -N -1 | Imports Concealing Corridor (1/2) | No encounter. | |
| 4F -N -2 | Imports Concealing Corridor (2/2) (5 AP) | 3 Servant Party Restriction A large Caster mob (350254k HP). Clear Reward: | |
| End of optional branch; continue from last branch point in steps below. | |||
| 4F -NE -1 | Gold Concealing Corridor (1/2) | No encounter. | |
| 4F -NE -2 | Gold Concealing Corridor (2/2) (5 AP) | 3 Servant Party Restriction Single wave with six Berserkers (16-29k HP). Clear Reward: | |
| End of optional branch; continue from last branch point in steps below. | |||
| 4F -SE -1 | Snack Concealing Corridor (1/2) | No encounter. | |
| 4F -SE -2 | Snack Concealing Corridor (2/2) (5 AP) | 3 Servant Party Restriction Single wave with six Berserkers (21-27k HP). Clear Reward: | |
| End of optional branch; continue from last branch point in steps below. | |||
| 4F -S -1 | Pet Concealing Corridor (1/2) | No encounter. | |
| 4F -S -2 | Pet Concealing Corridor (2/2) (5 AP) | 3 Servant Party Restriction Single wave with five Berserkers (21-37k HP). Clear Reward: | |
| End of optional branch; continue from last branch point in steps below. | |||
| 4F -NW -1 | Antique Concealing Corridor (1/6) | No encounter. | |
| 4F -NW -2 | Antique Concealing Corridor (2/6) (1 AP) | No encounter. | |
| 4F -NW -3 | Antique Concealing Corridor (3/6) (1 AP) | No encounter. Clear Reward: | |
| 4F -NW -4 | Antique Concealing Corridor (4/6) | No encounter. | |
| 4F -NW -5 | Antique Concealing Corridor (5/6) (1 AP) | No encounter. | |
| 4F -NW -6 | Antique Concealing Room (6/6) (5 AP) | 3 Servant Party Restriction A large Saber mob (97k HP). Clear Reward: | |
| End of optional branch; continue from last branch point in steps below. | |||
Walkthrough - Floor 5 (Post-Act 8)
| Quick Navigation | |||||
F1 | F2 | F3 | F4 | F5 | Act 7 |
F1 Post Act8 | F2 Post Act8 | F3 Post Act8 | F4 Post Act8 | F5 Post Act8 | Act 9 |
| 5F -N -1 | Bashful Corridor (1/2) | No encounter. | |
| 5F -N -2 | Bashful Corridor (2/2) (5 AP) | 3 Servant Party Restriction Single wave with two Riders (79k HP) and a Saber Servant (218k HP). Clear Reward: | |
| End of optional branch; continue from last branch point in steps below. | |||
| 5F -NE -1 | Locking Eyes Corridor (1/2) | No encounter. | |
| 5F -NE -2 | Locking Eyes Room (2/2) (5 AP) | 3 Servant Party Restriction Single wave with an Archer (21k HP) and two Shadow Servants: Assassin (41k), and Berserker (32k HP). Clear Reward: | |
| End of optional branch; continue from last branch point in steps below. | |||
| 5F -S -1 | Lustrous Corridor (1/2) | No encounter. | |
| 5F -S -2 | Lustrous Room (2/2) (5 AP) | 3 Servant Party Restriction Single wave with a Rider (27k HP) and two Shadow Servants: Berserker (36k), and Archer (33k HP). Clear Reward: | |
| End of optional branch; continue from last branch point in steps below. | |||
| 5F -SW -1 | Suggestive Corridor (1/2) | No encounter. | |
| 5F -SW -2 | Suggestive Room (2/2) (5 AP) | 3 Servant Party Restriction Single wave with an Archer (29k HP) and two Shadow Servants: Saber (31k), and Alter Ego (34k HP). Clear Reward: | |
| End of optional branch; continue from last branch point in steps below. | |||
| 5F -NW -1 | Night-Blooming Cereus Room (1/2) | No encounter. | |
| 5F -NW -2 | Night-Blooming Cereus Room (2/2) (5 AP) | 3 Servant Party Restriction Single wave with three Shadow Servants: Saber (32k), Berserker (37k), and Foreigner (29k HP). Clear Reward: | |
| End of optional branch; continue from last branch point in steps below. | |||
Walkthrough - Act 9-End - 8/6/2022 21:00 PDT
| Quick Navigation | |||||
F1 | F2 | F3 | F4 | F5 | Act 7 |
F1 Post Act8 | F2 Post Act8 | F3 Post Act8 | F4 Post Act8 | F5 Post Act8 | Act 9 |
| # | Quest | Notes | |
| 245 | Act 9 (5 AP) | Note this quest is found on the 4th floor. 3 Servant Party Restriction Also requires at least Single large Rider (376k HP) that can inflict a 2-turn Charm and deals bonus damage against Charmed enemies. Story: Pre-battle ~4min read Post-battle ~6min read | |
| 246 | Act 10.1-1 (5 AP) | 3 Servant Party Restriction A face off against a single break bar Servant boss (187k, 258k, 346k HP). As before, this boss is weak to Alter Ego and Foreigner classes. After 3rd break, the battle ends. At the start of every turn for the first 3 turns, all party members will have their NP reduced to 0%, so starting NP gauge CEs are not recommended! Note the boss will use an extra attack as their NP charge move. They can inflict burn when normal attacking after first break, and their burn will deal more damage after second break. Story: Pre-battle ~3min read Post-battle ~4min read | |
| 247 | Act 10.1-2 (0 AP) | Story only. Story: ~9min read | |
| 248 | Act 10.1-3 (0 AP) | Story only. Story: ~4min read | |
| 249 | Act 10.1-4 (0 AP) | Story only. Story: ~6min read | |
| 250 | Act 10.1-5 (0 AP) | Story only. Story: ~11min read | |
| 251 | Act 10.2-1 (5 AP) | High difficulty boss battle incoming! See the [Boss Guide] for tips on this encounter. Using [Ooku Hanafuda] in the shop will adjust the difficulty of the encounter, with six difficulties possible. No Hanafuda usage will set difficulty to the highest possible; 25 will set it to the easiest. [Black Ooku Hanafuda] allows for increasing the difficulty in case the encounter is deemed too easy after adjusting with Hanafuda. Story: ~6min read | |
| 252 | Act 10.2-2 (0 AP) | Story only. Story: ~5min read | |
| 253 | End-1 (0 AP) | Story only. Story: ~7min read | |
| 254 | End-2 (0 AP) | Story only. Obtain a (Receive Crystallized Lore instead if previously run) Story: ~12min read | |
| Congratulations! The Main Quest of the Tokugawa event is completed! | |||
Tokugawa Event Master Skills (Inrou Skills)
- These Master Skills will replace Mystic Code skills during this event.
- All Master Skills will have a cooldown of 99 turns (only usable once per encounter in all practicality), but in exchange become very powerful.
- These will first unlock after clearing Act 2, Part 4, on the first floor.
- Note that Mystic Codes equipped will still gain Mystic Code EXP, even if their skills cannot be used.
| 1 | Order of Compassion to the Living | CD: 99 |
 |  Inflict Stun on all enemies (1 turn). | |
Unlock:  Act 2 Part 4 (F1) Act 2 Part 4 (F1)Fifth Shogun Tokugawa Tsunayoshi's inrou | ||
| 2 | Ejima-Ikushima Affair | CD: 99 |
|  Inflict Stun on all enemies (1 turn). Decrease DEF for all enemies by 20% (1 turn). | |
| Unlock: Intermission 2 (F1) Seventh Shogun Tokugawa Ietsugu's inrou | ||
| 3 | Shoutoku's Rule | CD: 99 |
|  Inflict Stun on all enemies (1 turn). Decrease DEF for all enemies by 20% (1 turn). Decrease Quick Resist for all enemies by 20% (1 turn). | |
| Unlock: Lying Room (F2) Sixth Shogun Tokugawa Ienobu's inrou | ||
| 4 | Ansei Purge | CD: 99 |
|  Inflict Stun on all enemies (1 turn). Decrease DEF for all enemies by 20% (1 turn). Decrease Quick & Arts Resist for all enemies by 20% (1 turn). | |
| Unlock: Shinonome Room (F3) Fourteenth Shogun Tokugawa Iemochi's inrou | ||
| 5 | Start of Edo Bakufu | CD: 99 |
|  Inflict Stun on all enemies (1 turn). Decrease DEF for all enemies by 20% (1 turn). Decrease Quick/Arts/Buster Resist for all enemies by 20% (1 turn). | |
| Unlock: Hawk Room (F4) First Shogun Tokugawa Ieyasu's inrou | ||
| 6 | Taisei Houkan | CD: 99 |
|  Inflict Stun on all enemies (1 turn). Decrease DEF for all enemies by 20% (1 turn). Decrease Quick/Arts/Buster Resist for all enemies by 20% (1 turn). Decrease NP Gauge by 3 for all enemies. | |
| Unlock: Act 9 (F4) Fifteenth Shogun Tokugawa Yoshinobu's inrou | ||
| 1 | Dog Shogun | CD: 99 |
 |  Increase ATK for all allies by 50% (1 turn). | |
| Unlock: Act 2 Part 4 (F1) Fifth Shogun Tokugawa Tsunayoshi's inrou | ||
| 2 | Japan-US Treaty of Peace and Amity | CD: 99 |
|  Increase ATK for all allies by 50% (1 turn). Increase DEF for all allies by 20% (1 turn). | |
| Unlock: Intermission 3 (F1) Thirteenth Shogun Tokugawa Iesada's inrou | ||
| 3 | Great Fire of Meireki | CD: 99 |
|  Increase ATK for all allies by 50% (1 turn). Increase DEF for all allies by 20% (1 turn). Apply Evade to all allies (1 time, 1 turn). | |
| Unlock: Act 3 Part 4 (F2) Fourth Shogun Tokugawa Ietsuna's inrou | ||
| 4 | Suggestion Box | CD: 99 |
|  Increase ATK for all allies by 50% (1 turn). Increase DEF for all allies by 20% (1 turn). Apply Evade to all allies (1 time, 1 turn). Apply Ignore Invincible to all allies (1 turn). | |
| Unlock: Act 4 Part 4 (F3) Eighth Shogun Tokugawa Yoshimune's inrou | ||
| 5 | Takedown | CD: 99 |
|  Increase ATK for all allies by 50% (1 turn). Increase DEF for all allies by 20% (1 turn). Apply Evade to all allies (1 time, 1 turn). Apply Ignore Invincible to all allies (1 turn). Apply Damage Plus 2000 to all allies (1 turn). | |
| Unlock: Act 5 Part 3 (F4) Tenth Shogun Tokugawa Ieharu's inrou | ||
| 6 | Muketsu Kaijou | CD: 99 |
|  Increase ATK for all allies by 50% (1 turn). Increase DEF for all allies by 20% (1 turn). Apply Evade to all allies (1 time, 1 turn). Apply Ignore Invincible to all allies (1 turn). Apply Damage Plus 2000 to all allies (1 turn). Apply Guts to all allies (100% HP, Permanent). | |
| Unlock: Act 9 (F4) Fifteenth Shogun Tokugawa Yoshinobu's inrou | ||
| 1 | Tenna's Rule | CD: 99 |
 |  Increase Critical Stars by 50. | |
| Unlock: Act 2 Part 4 (F1) Fifth Shogun Tokugawa Tsunayoshi's inrou | ||
| 2 | Gujou Ikki | CD: 99 |
|  Increase Critical Stars by 50. Increase Star Drop Rate for an ally by 30% (1 turn). | |
| Unlock: Deceptive Room (F2) Ninth Shogun Tokugawa Ieshige's inrou | ||
| 3 | Buke Shohatto | CD: 99 |
|  Increase Critical Stars by 50. Increase Star Drop Rate for an ally by 30% (1 turn). Increase Critical Strength for an ally by 30% (1 turn). | |
| Unlock: Giant Wandering Maidservant A (F3) Second Shogun Tokugawa Hidetada's inrou | ||
| 4 | Tenpou Reforms | CD: 99 |
|  Increase Critical Stars by 50. Increase Star Drop Rate for an ally by 30% (1 turn). Increase Critical Strength for an ally by 30% (1 turn). Increase NP Strength for an ally by 30% (1 turn). | |
| Unlock: Giant Wandering Maidservant B (F4) Twelfth Shogun Tokugawa Ieyoshi's inrou | ||
| 5 | Kansei Reforms | CD: 99 |
|  Increase Critical Stars by 50. Increase Star Drop Rate for an ally by 30% (1 turn). Increase Critical Strength for an ally by 30% (1 turn). Increase NP Strength for an ally by 30% (1 turn). Increase NP Gain for an ally by 30% (1 turn). | |
| Unlock: Act 6 Part 3 (F5) Eleventh Shogun Tokugawa Ienari's inrou | ||
| 6 | Declaration of Restoration of Imperial Rule | CD: 99 |
|  Increase Critical Stars by 50. Increase Star Drop Rate for an ally by 30% (1 turn). Increase Critical Strength for an ally by 30% (1 turn). Increase NP Strength for an ally by 30% (1 turn). Increase NP Gain for an ally by 30% (1 turn). Increase NP Gauge by 50% for an ally. | |
| Unlock: Act 9 (F4) Fifteenth Shogun Tokugawa Yoshinobu's inrou | ||


