Drop Rate Calculator
To calculate the best farming areas based on your event drop bonuses, try out the Event Drop Rate Calculator!
Event Drop Rate Calculator
Drop Bonus Table
| Class | Oil Bonus |
| CEs |
|
|
| |
|
| |
|
|


|
|
|


|
|
|


|
|
|


|
|
|


|
|
|


|
|
| |
|
|

|
| Class | Cement Bonus |
| CEs |
|
|
|

|
|
|


|
|
|

|
|
|


|
|
|

|
|
|

|
|
|


|
|
|


|
|
| |
|
|
| Class | Realta Alloy Bonus |
| CEs |
|
|
| |
|
|


|
|
|

|
|
|
|
|
|


|
|
|


|
|
|


|
|
|


|
|
|


|
|
|

|
| Class | Eadrom Alloy Bonus |
| CEs |
|
|
| |
|
|


|
|
|


|
|
|


|
|
|


|
|
|
|
|
|

|
|
|


|
|
| |
|
|
| Class | Uisce Alloy Bonus |
| CEs |
|
|
| |
|
|


|
|
|

|
|
|


|
|
|


|
|
|

|
|
|


|
|
|


|
|
|
|
|
|
Servant Party Recommendations
| Servant Suggestions for Explosion (LVL 80) Difficulty | |||||
| Enemies | CE | High | Medium | Low | |
   |
|
|
'
|
| |
| Servant Suggestions for Annihilation (LVL 90) Difficulty | |||||
| Enemies | CE | High | Medium | Low | |
 |
|
|
'
|
| |
| Servant Suggestions for Explosion (LVL 80) Difficulty | |||||
| Enemies | CE | High | Medium | Low | |
|
|
|
|
|
| |
| Servant Suggestions for Annihilation (LVL 90) Difficulty | |||||
| Enemies | CE | High | Medium | Low | |
  |
|
|
|
| |
| Servant Suggestions for Explosion (LVL 80) Difficulty | |||||
| Enemies | CE | High | Medium | Low | |
 |
|
|
|
| |
| Servant Suggestions for Annihilation (LVL 90) Difficulty | |||||
| Enemies | CE | High | Medium | Low | |
|
|
|
|
|
| |
| Servant Suggestions for Explosion (LVL 80) Difficulty | |||||
| Enemies | CE | High | Medium | Low | |
|
|
|
|
|
| |
| Servant Suggestions for Annihilation (LVL 90) Difficulty | |||||
| Enemies | CE | High | Medium | Low | |
|
|
|
|
|
| |
| Servant Suggestions for Explosion (LVL 80) Difficulty | |||||
| Enemies | CE | High | Medium | Low | |
|
|
|
|
|
| |
| Servant Suggestions for Annihilation (LVL 90) Difficulty | |||||
| Enemies | CE | High | Medium | Low | |
|
|
|
|
|
| |
| Servant Suggestions for Explosion (LVL 80) Difficulty | |||||
| Enemies | CE | High | Medium | Low | |
|
|
|
|
|
| |
| Servant Suggestions for Annihilation (LVL 90) Difficulty | |||||
| Enemies | CE | High | Medium | Low | |
|
|
|
|
|
| |
Explosion Difficulty Farming Quests
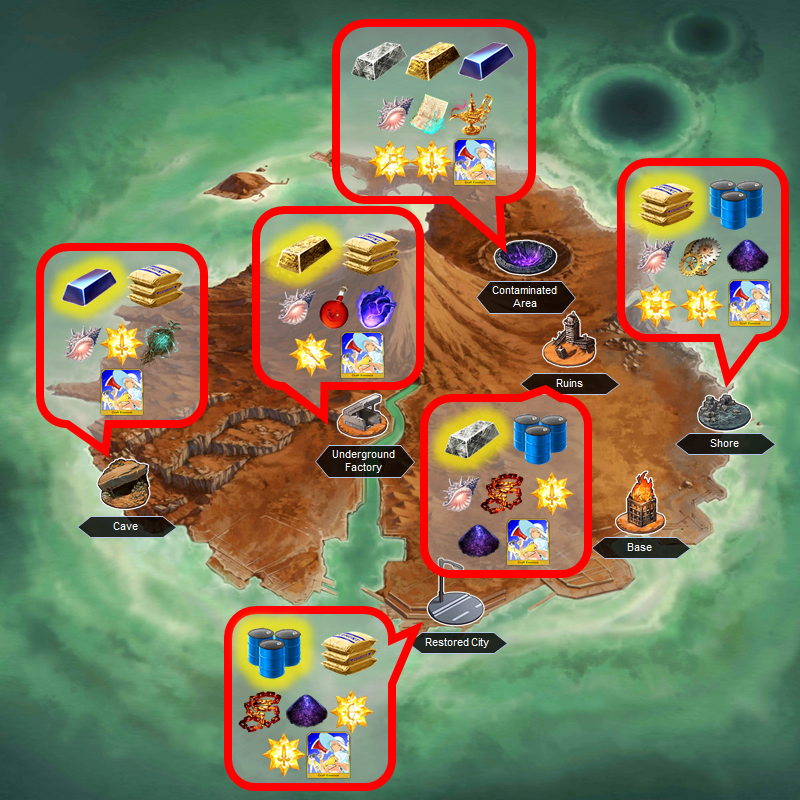
Farming Locations
Until you clear Chapter 7, these are the best Event resource farming locations.The following cutoff points do not take into account any bonus to
| Resource | Area | Notes | Enemy Classes |
Restored City 5 | Drops | Boss: | |
Shore 5 | Drops | Boss: | |
Ruins 5 | Drops Optimal with +9 | Boss: | |
Underground Factory 5 | Drops Optimal with +9 | Boss: | |
Cave 5 | Drops Optimal with +12 | Boss: | |
Contaminated Area 5 | Drops Optimal with +1~8 | Boss: |
Annihilation Difficulty Farming Quests
Farming Locations
Once you complete Chapter 7, these are the best Event resource farming locations.The following cutoff points do not take into account any bonus to
| Resource | Area | Notes | Enemy Classes |
Restored City 6 | Drops | Boss: | |
Shore 6 | Drops | Boss: | |
Ruins 6 | Drops Optimal with +6 | Boss: | |
Underground Factory 6 | Drops Optimal with +6 | Boss: | |
Cave 6 | Drops Optimal with +6 | Boss: | |
Contaminated Area 6 | Drops Optimal with +1~5 | Boss: |
Obtain ![]() by clearing the Post Event Quests, after completion of Main and Brilliant Summer Quests!
by clearing the Post Event Quests, after completion of Main and Brilliant Summer Quests!
Back to FGO Summer 2018: Civilization of Evolution (Part 2) Compact Farming Guide (Part 1)
In-depth Guides and Resources


Event Shop


Event Quests


Summer 2018 Part 1 Guide