Event Guides


Event Quests

Introduction
- This guide is a summary of all the farming information for Part 2 of the Summer 2018 Event
- The main objective for this event is to complete the Main Quest to permanently unlock Scathach (Assassin), then gather Gae Bolg replicas to turn in for copies of Scathach (Asssassin).
- Scathach (Assassin)'s Ascension Materials can only be acquired in Part 1.
- Note: Demolishing and rebuilding each different option of Development Quest 12 will reward additional (cheap) Crystalized Lore!
- Buy the Event CEs from the Event Shop only after the Main Quest is completed as unlocking higher difficulties earlier is more rewarding.
- Only returning Masters from last year should MLB Chaldea Lifesavers.
- Chaldea Lifesavers can be useful for an upcoming Instant Death Challenge Quest and all copies will pay for themselves if Masters need at least around 5500/6000 Oil and Cement.
- Finish farming for Realta / Eadrom / Uisce Alloy first as their ideal farming locations all drop Cement / Oil.
Event period expires in:
Automatic Efficiency Calculator
Notes on Automatic Efficiency Calculator
The Automatic Calculator assumes a Masters will farm with the maximum amount of ideal Servant class bonus available.
Note for Masters from last year:
- Fielding an MLB Chaldea Lifesavers of your own is *always* more efficient than fielding a non-MLB gacha CE while farming any of the Alloys
- Thus for a (very slightly, the difference is only 1-2 runs) more optimal route, Masters with an MLB Chaldea Lifesavers should only enter 4 non-MLB copies for, say, Shining Goddess in the calculator even if they have 5 copies.
- An MLB gacha CE is still always better.
Enter in the total currency you need from the shop below.
Drop Bonus Table
| Class | Event CE | Event Bonus (MLB) |
Annihilation Difficulty Farming Quests
Farming Locations
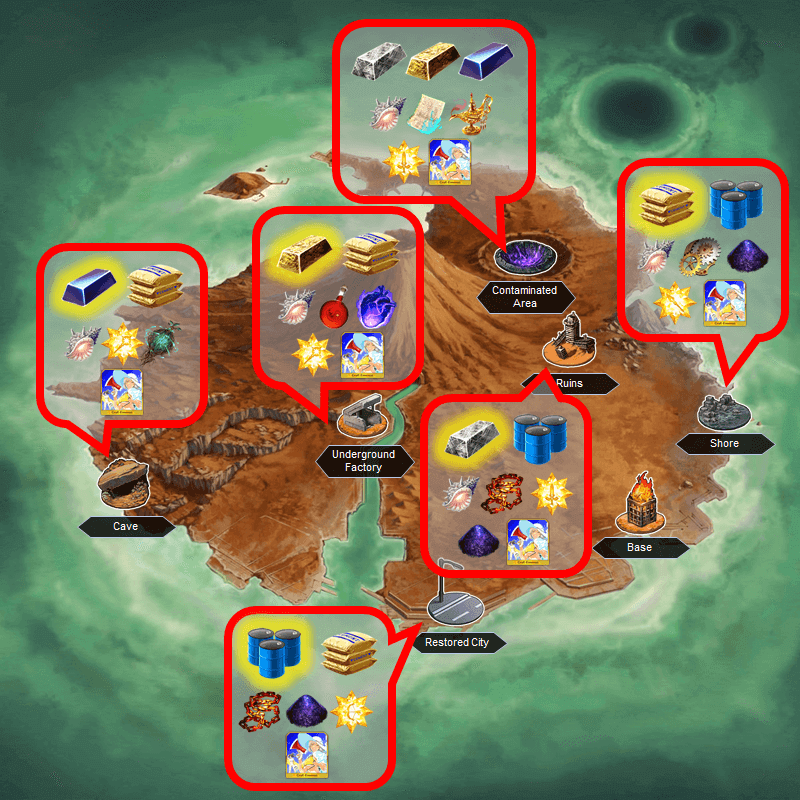
After completing Chapter 7 these are the best Event resource farming locations.The following cutoff points do not take into account any bonus to
| Resource | Area | Notes | Enemies |
Restored City 6 | Drops | Boss: | |
Shore 6 | Drops | Boss: | |
Ruins 6 | Drops Optimal with 6+ | ||
Underground Factory 6 | Drops Optimal with 6+ | Boss: | |
Cave 6 | Drops Optimal with 6+ | Boss: | |
Contaminated Area 6 | Drops Optimal with +1~5 | Boss: |
Obtain ![]() by clearing the Post Event Quests, after completion of Main and Brilliant Summer Quests!
by clearing the Post Event Quests, after completion of Main and Brilliant Summer Quests!
Servant Recommendations
- Not all Locations can be farmed easily with full bonus. In this part, the Restored City and Shore areas do not have fully optimal Servants as the class counter.
- For these two locations, bringing 1-2 Servants with the secondary drop bonus will boost clear speed immensely.
- Restored City is not a map to slowly clear as Tesla is just the worst. Bring Lancers who can quickly dispose of him.
- Shore is a bit more dangerous to clear with full bonus especially as Raikou and Jack(Rider) are a dangerous combination, consider bringing a Saber to speed up wave 1 and 2.
- Ruins can also be annoying to farm with Jeanne d'Arc (Alter). While BB is a safe option, she's not exactly fast, NP spam from Archers or MHX(Saberface!) will work just as well.
- Underground Factory is completely countered by Alter Ego Servants, especially with support Casters having full bonus.
- Cave is, unlike in Part 1, fully countered by the Riders. Make sure to include some Rider offensive support such as Alexander or Ozymandias for a faster clear.
- Contaminated Area: Easily countered by Archers, especially as Support Casters are also available.
- If the Drop Rates from the original run are similar, then there are no outstanding Free Quests worth farming after clearing the Event Shop, especially with a lottery on the horizon.
| Event Drop | Area | Advice / Suggested Servants |
Class |
Restored City |
Drops: |
Boss: |
|
Shore |
Drops: |
Boss: |
|
Ruins |
Drops: |
||
Underground Factory |
Drops: |
Boss: |
|
Cave |
Drops: |
Boss: |
|
Contaminated Area |
Drops: |
Boss: |
|
Drop Rate Calculator
Estimated Total Drops
 |
 |
 |
 |
 |
|
|---|---|---|---|---|---|
| Shore 4 | - | - | - | - | - |
| Shore 5 | - | - | - | - | - |
| Shore 6 | - | - | - | - | - |
| Ruins 4 | - | - | - | - | - |
| Ruins 5 | - | - | - | - | - |
| Ruins 6 | - | - | - | - | - |
| Factory 4 | - | - | - | - | - |
| Factory 5 | - | - | - | - | - |
| Factory 6 | - | - | - | - | - |
| Cave 4 | - | - | - | - | - |
| Cave 5 | - | - | - | - | - |
| Cave 6 | - | - | - | - | - |
| City 4 | - | - | - | - | - |
| City 5 | - | - | - | - | - |
| City 6 | - | - | - | - | - |
| Area 4 | - | - | - | - | - |
| Area 5 | - | - | - | - | - |
| Area 6 | - | - | - | - | - |
Note: Drop Rates estimates are sourced from the datamine from Kazemai.